Pages

Thursday, June 28, 2018

Poached Salmon w/ Pink Moscato Butter Sauce - Wild Alaskan Salmon

This evening I made Poached Salmon with Pink Moscato Butter Sauce. It was absolutely delicious and so very simple to make. If you don't have that particular wine, you can use whatever wine you have on hand or swap it out with fresh orange juice if you don't want any alcohol in the sauce.

The salmon only took 7 minutes to poach (I used about 1 cup of liquid; half water and half wine). I moved the salmon to a platter, then covered it and poured off the poaching liquid. I then used the same skillet to make the easy peasy sauce wine-butter sauce. Hubby and I really enjoyed it and the sauce enhanced the salmon without covering up its delicate flavor. I served our salmon alongside crispy roasted brussels sprouts tossed in oil and seasoned with salt before roasting at 425 for about 12 minutes (tossing once).

I snapped a few photos and included the recipe below. For those of you that have The Fresh Market in your area, they now have fresh Wild Alaskan Sockeye Salmon available for $16.99/lb which is the same that I paid at Costco. Enjoy!


Poached Salmon w/ Pink Moscato Butter Sauce

Ingredients:

1-1/2 pounds of salmon fillets (approximately 4 6-ounce servings)
1 cup water
1/4 teaspoon dried thyme
Sea salt, to taste
4 tablespoons butter, divided
3 green spring onions (scallions), sliced
1/2 cup Pink Moscato wine (or preferred white or pink wine; or orange juice can be used instead)

Directions:

Arrange salmon fillets in a single layer in a 12-inch nonstick skillet. Pour water in skillet; season salmon with thyme and salt, to taste. Cover pan and bring to a boil over medium-high heat. Once it comes to a boil, turn heat down and simmer covered over medium heat for approximately 7 minutes. Remove salmon to a platter and cover. Discard poaching liquid.

In same skillet, melt 1 tablespoon butter over low-medium heat. Add scallions and sauté until tender, about 3 to 4 minutes. Pour wine into skillet and bring to a simmer over medium heat. Add remaining 3 tablespoons of butter 1 tablespoon at a time, whisking in until melted. Season with salt, to taste. Continue to simmer uncovered for 3 or 4 minutes until sauce reduces and thickens slightly; taste for seasoning and adjust as necessary. Spoon sauce over top of salmon fillets.


Sunday, June 24, 2018

Grill Roasted Wild Alaskan Salmon w/ Herb Butter & Greek Yogurt Lemon Dill Sauce

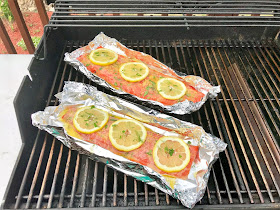
Friday afternoon, I found the first fresh wild Alaskan Salmon at Costco. I was so excited because its the first I've seen it in our area this season. It's definitely coming in later than usual this year. My youngest son, who also happens to love salmon, came for dinner last night. I whisked together a simple herb butter to brush on the salmon before cooking and then roasted the salmon on the grill in open foil packets which only takes about 10 minutes or so to do. I wanted to make a fresh and cool lemon dill sauce to top our salmon with. Most of the dill sauces had either mayonnaise or sour cream, neither of which my son likes so I made one using Fage 5% plain Greek yogurt. It was SO good and fresh tasting and was so easy to stir together and put in the fridge for a bit before preparing dinner. If you like tzatziki, you will love this. It's very much like tzatziki, without cucumbers but you could add cucumber too, if desired. See the easy recipe for salmon below and my Yogurt-Lemon-Dill Sauce in the next paragraph.

My easy recipe for the Greek Yogurt Lemon Dill Sauce is here. In a small bowl, combine the following ingredients: 1 cup plain Greek yogurt; 1 teaspoon fresh lemon zest, 1 tablespoon fresh lemon juice, 2 tablespoons chopped fresh dill, 1/4 to 1/3 cup chopped fresh chives or thinly sliced scallions, 1/4-1/2 teaspoon sea salt, few generous grinds of black pepper, and 1 tablespoon extra virgin olive oil. Test taste and adjust seasoning, to taste. Refrigerate and allow flavors to blend.

I hope you are fortunate enough to find yourself some wild Alaskan salmon near you. Check out the photos and easy salmon recipe below. Enjoy!


Grill-Roasted Wild Alaskan Salmon with Lemon Herb Butter

Ingredients:

2 pounds wild salmon fillets (rinsed and patted dry)
3 to 4 tablespoons butter
1 - 2 tablespoons chopped fresh dill
1 tablespoons chopped flat Italian leaf parsley
1 medium lemon, zested and juiced (squeezed juice)
1/4 - 1/2 sea salt, or to taste
1 medium lemon, sliced

Directions:

Preheat grill (or oven) to 425-450 degrees. In a small saucepan, melt 3 to 4 tablespoons butter over low heat. Remove from heat and whisk in dill, parsley, 1 teaspoon lemon zest, 1 tablespoon lemon juice and sea salt, to taste.

Place salmon fillets in center of large sheet of foil. Gently crimp and form foil into a packet around salmon fillet to hold butter and juices as it roasts (keep packet open on top while roasting). Brush salmon fillets with herb butter and place lemon slices on top. Carefully put foil packets of salmon on hot grill and close lid. Try and maintain grill temperature between 425 and 450 degrees F. Cook for 10 to 12 minutes, depending on thickness of fillets. Carefully remove and transfer foil packet to a platter or baking sheet. Crimp and close packet tightly to allow salmon to continue cooking gently off the heat for about 5 to 10 minutes. 


Wednesday, June 20, 2018

Grilled Summer Veggie Lasagna - Easy Low Carb

This evening I made a delicious grilled summer vegetable lasagna using the bounty of fresh zucchini, yellow summer squash and eggplant that I had on hand. I had 2 medium eggplant, about 2-1/2 pounds of a mixture of yellow squash and zucchini. The only other ingredients I used were a jar of Rao's Arrabbiata Sauce, 2 cups of shredded mozzarella cheese, 1/4 cup shredded Parmigiana Reggiano cheese, olive oil and salt (to brush on the sliced veggies before grilling). I will post the actual easy recipe later this evening but wanted to get the photos up. It turned out AMAZING! I picked up the 2 eggplants at Sprouts Farmers Market a few days ago and they were only $1.00 each. I picked up a mixed bag of organic zucchini and yellow summer squash at Costco over the weekend. I always keep jars of sauce in my pantry along with olive oil and I always have shredded cheeses available in the fridge. As soon as I got home from work, I fired up our grill, washed and sliced the veggies, brushed with oil and sprinkled with salt. I grilled the veggies in 2 stages; first the eggplant and then the squash and zucchini. They only took about 7 to 8 minutes to grill until tender but not too soft they would fall apart when taking off the grill or layering. It took about 5 minutes to assemble the casserole and less than 30 minutes to bake. I let it sit for about 10-15 minutes so the cheeses would set up before cutting it. It cut into beautiful pieces. Hubby and I enjoyed it and it was the perfect meal to enjoy on the night before the official start of Summer tomorrow. Of course, we have lots leftover for us both to enjoy for several more dinners. It would make an awesome side dish to grilled marinated chicken or other meat as well. Check out the photos of the easy steps below. I'll be back later to add the actual written recipe. Enjoy!


Using your grill is a great way to help you make lasagna in the summertime


Grilled Summer Vegetable Lasagna

Ingredients:

2 medium eggplant, sliced approximately 1/2" thick (eggplant can be peeled if desired)
2-1/2 pounds zucchini and yellow summer squash, sliced lengthwise approximately 1/4" thick
1/4 - 1/3 cup olive oil (to brush eggplant and squash with)
Sea salt, to taste
1 24-ounce jar of your favorite pasta sauce (I used Rao's Homemade Arrabbiata)
2 cups shredded mozzarella cheese
1/3 cup shredded Parmigiana Reggiano (or Parmesan cheese)

Directions:

Brush both sides of eggplant, zucchini, and yellow squash with olive oil and sprinkle with salt, if desired. Grill on a 400-450 degree F grill for approximately 3 minutes per side, or just until tender (be careful not to overcook and make mushy so vegetables don't fall apart). Remove from grill to a platter.

Preheat oven to 400 degrees F. Lightly oil a 9" x 13" casserole dish and spread about 1/2 cup of the pasta sauce, just enough to coat bottom of dish. Layer eggplant slices on bottom, overlapping slightly. Spoon 1/2 of the remaining sauce over top of the eggplant; then scatter 1 cup of mozzarella on top. Layer zucchini and yellow squash next, overlapping slightly. Spread remaining sauce over top; scatter remaining 1 cup mozzarella on top; then scatter Parmesan cheese last. Bake uncovered at 400 degrees for 20 to 25 minutes or until hot and bubbly. If desired, run under broiler for a few minutes to brown top layer of cheese. Allow lasagna to sit about 10 minutes so cheese sets up and can be cut into neat squares.

*Note: If desired, you can increase amount of cheese. Sauce should be used sparingly to keep from adding too much liquid to the casserole since the vegetables don't absorb liquid the way regular pasta noodles do. I prefer to partially skin my eggplant by using a vegetable peeler lengthwise, removing 1 swipe every other row (it looks striped when done). I like to slice the eggplant into rounds but you can slice it lengthwise if preferred. The vegetables can also be roasted in the oven until tender, however grilling them helps dry the excess juices up making your lasagna non-watery. If preferred this can be made using all eggplant, or all zucchini or squash. You can also add a layer of cooked ground beef, if desired.


Saturday, June 16, 2018

Mexican Style Chicken Meatloaf - Easy Peasy

Earlier this week I made a 2-pound Mexican Style Chicken Meatloaf using ground chicken breast. It was so very easy to mix together with ingredients that I had on hand. We actually ate that meatloaf for 3 night's dinners and I had it once for lunch and believe it or not, I was sad to see it go. 

Here's the easy recipe that I used: 2 pounds of Perdue Ground Chicken Breast; 1 cup favorite salsa; 2 Tbsp olive oil; 1 tsp smoked paprika; 3/4 tsp roasted ground cumin; 1/2 tsp ground chipotle pepper; 1/4 tsp salt; 2 cups shredded sharp cheddar cheese, Monterey, or Pepper-Jack cheese. Mix together in large bowl, form in loaf and place in center of shallow baking dish or casserole and bake at 400 degrees F for 1 hour to 1 hour 15 mins or until done. If desired, spread additional salsa on top of loaf before baking (this helps keep it super moist); top with additional shredded cheese during the last 10 mins of cooking, if desired. No breadcrumbs or eggs necessary. The cheese serves as the binder to hold the meatloaf together. 

The second night that we ate it, I sliced it cold and heated some butter in a non-stick skillet until it began to very lightly turn golden, then I added the slices of meatloaf, covered for a few minutes and once they were nice and golden brown, I flipped them over and browned on the other side. I scooted them over to a plate and cooked fried eggs in a separate small skillet while I added cut up multi-colored baby tomatoes to the skillet I cooked the meatloaf in and sautéed them in the pan drippings. I topped our browned meatloaf with a bit of shredded sharp cheddar cheese, a fried egg, and the sautéed tomatoes. It was amazing. We finished up our meatloaf last night and I look forward to making it again soon. 

This morning I made a delicious omelet for brunch filled with sautéed Vidalia onions, red bell peppers, mushrooms and baby spinach along with some sharp cheddar cheese. I served it with local Delia's Chicken Sausage. It lasted us all day long. I got ready to grill steaks this evening and the sky opened up and it began to thunder and rain so that has been pushed until tomorrow (hopefully). We didn't expect any rain today. I was disappointed that our Costco trip last night did not produce any Copper River Wild Salmon. Our consolation prize (of sorts) was filet mignon. Maybe they'll get some in next week I hope! Check out the photos of this week's delicious meals below. Enjoy! 


This was absolutely delicious (egg and tomato topped butter browned meatloaf)
This morning's omelet filled with delicious veggies & chicken sausage


Sunday, June 10, 2018

Easy Deep Dish Pizza - Low Carb, Grain Free, Gluten Free

This evening I created ANOTHER pizza crust (as if I don't have enough versions already). I wondered if I could make one that combined my Cheese Head Pizza Crust with my Chicago Style Deep Dish Pizza Crust. Well, it turned out DELICIOUS! It created a thick and lighter more "bready" crust like traditional deep dish pizza yet still formed a nice crispy edged crust. This crust recipe was very good and I will definitely be making it again. With it being a thick crust pizza, I could only eat one piece. I used my 10-inch Calphalon Unison non-stick pan (oven safe) and it yielded 6 nice sized pieces. A cast iron skillet would also work nicely for this crust. The process for making the crust is almost identical to my Cheese Head Pizza Crust but has additional ingredients to create the "breadiness" more along the lines of my Chicago Style Crust (it adds a little ground golden flaxseed which I reduced significantly for this crust, baking powder, baking soda and a little buttermilk so the acidity can react with the baking powder and soda to create a bit of rise). If you don't have buttermilk, simply add about 1/4 to 1/3 teaspoon lemon juice or white vinegar to 1/4 cup milk, half-n-half or cream (or almond milk) and let it sit for a few minutes. It works just as well to add some acidity to help with the rise. I topped my pizza with sauce, Sargento's shredded Mozzarella & Provolone blend cheese and sliced red bell peppers and Vidalia onions. It was absolutely delicious!  Check out the photos and recipe below. You will be amazed that this pizza was made without regular flour. Enjoy!

Deep Dish Pizza - Low Carb, Grain Free, Gluten Free, LCHF, Keto - AWESOME!


How deep is your love...for DEEP DISH Pizza?  I really need to know...


Deep Dish Pizza Crust - Low Carb

Ingredients:

For the Crust
2 cups shredded mozzarella cheese
3 ounces "brick-style" cream cheese
1/4 cup finely grated Parmesan cheese
2 teaspoons baking powder
1/2 teaspoon baking soda
1/2 - 1 teaspoon Italian seasoning or dried basil
1/4 teaspoon sea salt, or to taste
1/4 teaspoon onion powder
1/8 teaspoon garlic powder
1 large egg, lightly beaten
1/4 cup buttermilk
2 tablespoons olive oil 

For the Toppings, Etc.

3/4 to 1 cup pizza sauce, or to taste
1-1/2 to 2 cups shredded mozzarella cheese
Olive oil for greasing pan
Toppings, as desired (pepperoni, cooked sausage, peppers, onions, cooked mushrooms, etc.) 

Directions:

Preheat oven to 400 degrees F.  In a medium sized bowl, place mozzarella cheese and cream cheese. Heat cheese in microwave on high for 45 seconds; stir and heat an additional 30 to 45 seconds or until a hot melty mass of cheese is formed.

While cheese is melting in microwave, combine next 9 dry ingredients together in a medium bowl and stir with a whisk to help break up any lumps. In a separate small bowl, combine egg, buttermilk, and olive oil.  When cheese is melted, add flour mixture to bowl of hot melted cheese. Working quickly, fold and stir mixture together with a rubber spatula until a ball of dough is formed. Add egg, buttermilk and olive oil mixture, folding with a rubber spatula until combined and a sticky dough has formed (make sure the cheese mixture is hot before adding flour and egg mixture).   

Generously grease a 10 to 12-inch cast iron skillet or oven proof skillet with olive oil. Using a rubber spatula sprayed lightly with oil, place the dough in the center of the baking pan and begin working your way pressing the dough out toward the edges, about 3/4 to 1-inch thick spreading the dough up the sides of the pan about 1-inch high.

Bake for 20-25 minutes, or until golden brown. Remove from oven and add sauce, mozzarella, and desired toppings. Reduce oven temp to 375 degrees F. Bake an additional 8 to 10 minutes or until the cheese is melted. If additional browning is desired, run under broiler for a few minutes until bubbly and cheese is lightly browned. Carefully remove from oven and let sit about 5 to 10 minutes for cheese to set. Cut into wedges and serve. If using a nonstick ovenproof skillet, adjust baking time as necessary (it will heat more quickly than cast iron), then slide finished pizza onto a cutting board before slicing so you don't damage your pan.


Thursday, June 7, 2018

Easy Poached Wild Copper River Salmon

Tonight we enjoyed poached Wild Alaskan Copper River Salmon for dinner (these are what I had frozen last year). I placed sliced Vidalia Onions and lemon slices in the bottom of a large nonstick skillet, then placed my beautiful “mostly thawed” fillets on top. I seasoned them with sea salt and a bit of dried dill (I didn't have any fresh), then poured 1 cup of white wine over top (you can use half wine, half water or just water if preferred). I covered the pan and placed it on the stovetop over medium-high heat until it began to simmer and then cooked/poached them covered over medium heat for about 7 minutes or until opaque and it flaked easily when pressed with a fork. I served it topped with a pat of butter melting on top. Note that you will never see this brilliant color in any farmed salmon. My motto is eat wild salmon or eat no salmon at all (#justsayNOtofarmedsalmon)! 

I can't wait for this season's fresh salmon to reach our markets here in Atlanta. I called all over the place multiple times last weekend and this past week. I will begin my search for it yet again this weekend! I think that Costco, The Fresh Market, and Whole Foods probably recognize my voice at this point and I'm sure there's a major eye roll that occurs when they hear it. No worries...I just roll my eyes back and sweetly ask if they've received their shipment of wild Alaskan Copper River Salmon yet! Check out my skillet of salmon before I placed it on the stove to cook! Enjoy!


Tuesday, June 5, 2018

Pan Seared Halibut in Brown Butter & Creamed Dijon Spinach

This evening I was looking forward to preparing the remaining 3 fillets of fresh Wild Pacific Halibut. First of all, I really, REALLY love halibut; second of all, it only took 6 minutes to cook (how great is that)! I wanted to change it up a bit from last night so I kept the halibut very simply. I heated 1 to 2 tablespoons of butter in a 10-inch nonstick skillet until it just began to brown (it was deep golden). I added the 3 fillets that had been seasoned with a pinch of sea salt and few grinds of black pepper and cooked them over medium-high heat for 3 minutes, and then flipped them over and cooked for an additional 3 minutes before transferring them to a plate and covering for about 3 minutes to sit.

Before I cooked the halibut, I prepared the most delicious and easy Creamed Dijon Spinach with the pound of organic baby spinach I had in the fridge (I only cooked about 10 ounces of it). It served as both a delicious side dish to our halibut as well as an amazing creamy Dijon sauce for the fish. The best part is that it required no flour to thicken...only creamed cheese. I used the creamed spinach as a base to place the halibut atop of and then added another spoon of it over the fish, too. You'd be amazed at how great cream cheese substitutes for flour in creamy sauces. I included the easy peasy recipe for the Creamed Dijon Spinach below. Enjoy!


Creamed Dijon Spinach

Ingredients:

2 tablespoons butter
3 ounces brick style cream cheese
3/4 cup of half-n-half, cream or milk
Pinch of salt, to taste
Few generous grinds of black pepper, to taste
1/8 teaspoon onion powder
Dash of garlic powder
1 rounded tablespoon Dijon Mustard (add more if desired)
10 ounces of lightly sautéed baby spinach

Directions:

In a small saucepan over low heat, add butter and cream cheese to soften and melt, about 3 to 5 minutes, stirring occasionally. Once it has softened, whisk it together until smooth; add milk or cream, whisking to blend. Increase heat to low-medium until sauce is hot, then turn back to low. Add salt, pepper, onion powder, garlic powder and Dijon mustard. Whisk together over low heat and heat until hot. Taste and adjust seasoning as desired; add more milk for a thinner sauce or more mustard for a stronger mustard flavor. Stir spinach into sauce and heat through.

*Note: If desired increase amount of spinach to 16 ounces.