Sunday, May 28, 2017

Broccoli-White Cheddar Frittata - Low Carb Sunday Breakfast

Happy Sunday! This morning I woke up around 6:00 and the first thought that went through my mind was..."oh no, I forgot to cover the grill last night"...and rain was expected this morning. I ran out and quickly covered the grill and while doing so, the sky opened up and the wind came from nowhere and we had violent thunderstorms with lots of lightening and pounding rain. Since hubby and I got up so early, we made a cup of coffee and went out and sat on the screened porch and listened to and watched the storm. It lasted for over an hour and then changed over to just rain. By 11:00 this the sun actually popped out which should make for some nice humidity.

Since we were up early, I went ahead and made an early breakfast. I had about 1 cup of leftover steamed broccoli in the fridge and a wedge of Tillamook Limited Edition Extra Sharp White Cheddar Cheese I've been wanting to try so I decided a Broccoli-White Cheddar Frittata was in order. It was so simple to make and a great way to use up some leftover broccoli and try out the cheese at the same time. I used my Calphalon 8-inch nonstick oven safe skillet for the frittata. I like to start my frittatas on the stove top. I begin by letting a pat of Kerrygold butter begin to sizzle, then pour the frittata mixture into the skillet so it can immediately start forming a "crust" and then pop it into the oven for about 20 minutes to bake. I placed some bacon on a cookie sheet and popped it into the oven before the frittata came out so everything would come out together. I added a couple of big ripe organic Driscoll's strawberries to our plates and breakfast was served! We enjoyed it and I have enough leftover to reheat for breakfast tomorrow. I snapped a few photos and included the easy peasy recipe below. Enjoy!


Fresh out of the oven


Broccoli-White Cheddar Frittata 

Ingredients:

1 tablespoon butter
1 cup cooked broccoli florets, chopped
1 cup shredded sharp white cheddar cheese (I used Tillamook extra sharp)
8 large eggs
Sea salt and black pepper, to taste

Directions:

Preheat oven to 400 degrees F. Beat eggs in a medium bowl. Stir in broccoli and shredded cheese; add salt and pepper, to taste.

Melt butter in an 8-inch ovenproof non-stick skillet over medium-high heat. When butter begins to sizzle, pour egg mixture into skillet and cook for 2 to 3 minutes to allow outer edges to crust slightly. Place skillet in oven and bake for about 15 to 20 minutes until lightly golden on top and center of frittata doesn't jiggle when the skillet is shaken slightly. Allow frittata to sit for a few minutes. Use a rubber spatula to help slide the frittata onto a cutting board. Cut into wedges and serve.


Saturday, May 27, 2017

Marinated Grilled Chicken and Yellow Cheddar Squash Casserole

This morning we enjoyed the cool morning temps and sat out and had breakfast on the porch. It might be one of the last cool mornings because temps are heading upward over the next couple of days. We ran errands and then just relaxed and watched movies this afternoon. This evening I grilled boneless chicken breasts that I marinated in a blend of olive oil, vinegar, Italian Seasoning, salt and pepper that I simply whisked together. I marinated the chicken in a Ziploc bag for a few hours (it's even better if you can marinate it longer). I grilled it over medium-high heat (about 400 to 425 degrees) for about 6 to 7 minutes per side, but the cooking time depends on the thickness of your chicken. I like to use a rolling pin and beat the chicken breasts while in the Ziploc bag (before adding marinade) so they are even in thickness. They turned out juicy and flavorful.

To go with our grilled chicken, I made my favorite Yellow Cheddar Squash Casserole. It's the perfect side dish for this time of year when squash becomes more plentiful. It truly is one of my favorites and my entire family loves it. The recipe is linked in the red colored letters in the first sentence of this paragraph. If you haven't tried it before, this one is worth trying. I have plenty left to use over the next couple of days and it reheats nicely. I snapped a couple photos below. Enjoy!


Friday, May 26, 2017

Grilled Cheddar Burgers - First Grill of the Season

This evening we fired up the grill for the first time this year. We kept it simple and fixed burgers. I purchased freshly ground chuck at Fresh Market this afternoon (it was on sale for $2.99/lb, normally $6.00/lb). I used 1 pound of beef and mixed it with 1 tablespoon each yellow mustard and organic ketchup (no HFCS). I also mixed in about 1/3 pound of shredded sharp cheddar cheese and then added a pinch of salt and few grinds of black pepper. I divided and shaped the meat into 3 one-inch thick burgers. After preheating the grill, I grilled them for about 5 to 6 minutes per side over medium-high heat, until they were medium-well but still juicy, then placed them on a plate and covered with foil until ready to serve.

I also sliced up a Vidalia onion and placed it in a foil packet with a pat of Kerrygold butter and seasoned it with salt and pepper, then placed the packet on the grill while the grill was heating up. I moved it to the side away from the fire while the burgers cooked. The onions turned out so tender they literally melted in your mouth. I sliced a tomato and steamed some fresh broccoli and in about 20 minutes from beginning to end, dinner was ready. I topped our burgers with a slice of Asiago cheese. It was simple, fresh and delicious. What is it about the first grilled burgers of the season that taste so good? I snapped a few photos below. Enjoy!


Sunday, May 21, 2017

Easy Pulled Chicken - Instant Pot Recipe

This evening I made a delicious and simple dinner. We had quick and easy pulled chicken that I prepared in my Instant Pot (I have the 8-quart version). I already had barbecue sauce that I had made earlier in the week, but you can use your own personal favorite sauce. The recipe only uses 1/2 cup of sauce. I served the pulled chicken in baby romaine lettuce cups and it was absolutely delicious! This is the second time I've made it and it is awesome. You will never believe you are eating chicken breasts because the meat turns out so tender, juicy and flavorful.

Before filling the mini lettuce cups, I stirred in some shredded sharp cheddar cheese to make it extra yummy. I served my Easy Coleslaw alongside it. I actually prepared the pulled chicken last night and made the coleslaw earlier this morning, so all I had to do to get it on the table this evening was heat the pulled chicken and pull out the bowl of coleslaw. We had very heavy rain overnight and a good part of today which made the humidity crazy. It was 70 degrees this morning with 89% humidity -- yuck! I've included the link to my coleslaw recipe above and added the super easy Instant Pot recipe for the pulled chicken below as well as the recipe for the barbecue sauce immediately underneath. Feel free to use whatever sauce you like best. I like a little mixture of sweet and heat in my sauce. I snapped a quick photo below. Oh, and yes, in case you are wondering...that is a paper plate. Like I said, we kept dinner super easy tonight. Enjoy!


Easy Pulled Chicken - Instant Pot Recipe

Ingredients:

1 to 2 tablespoons olive oil
2 to 2-1/2 pounds boneless skinless chicken breasts (or substitute boneless skinless thighs)
Dusting of ground chipotle powder (optional)
1/2 cup barbecue sauce (recipe below)
1/4 cup water

Directions:

Select the "Saute" setting on your Instant Pot. When it begins to get hot, add oil to the bottom of the pot. Lightly dust the chicken breasts with chipotle powder, if desired. Place chicken in the Instant Pot and saute until lightly golden, about 5 minutes. Turn chicken breasts over and repeat on the other side. Select the "Cancel" button to stop the saute function. 

Spoon barbecue sauce over top of the chicken. Pour water into pot. Close and lock lid, making sure your silicone sealing ring is properly installed (if not, it won't be able to build pressure). Make sure the steam release button on top of the lid is pointed towards "sealing". Select the "Poultry" setting and increase the pre-selected cooking time to register 20 minutes. After the cooking is complete, allow it to "naturally release". You can safely open the lid once your float valve goes down. Using 2 forks, pull the chicken apart while in the pot until shredded and mixed with the juices. Taste for seasoning. Serve on buns or in small lettuce cups topped with shredded cheese, if desired.


Sweet & Spicy Chipotle Barbecue Sauce

Ingredients:

1 6-ounce can tomato paste
1/4 cup water
3 tablespoons Swerve sweetener
1 teaspoon pure pineapple extract
2 dashes ground cinnamon
1 pinch ground cloves
1/4 cup apple cider vinegar
2 tablespoons balsamic vinegar
1 tablespoon white vinegar
1 tablespoon Worcestershire sauce (I used Lea & Perrins original)
1 teaspoon Tamari sauce (I used San-J organic gluten free)
1-1/2 teaspoons ground mustard
1 teaspoon sea salt, or to taste
1/2 teaspoon smoked paprika
1/4 teaspoon ground chipotle powder, or to taste
1/2 teaspoon onion powder
1/8 teaspoon garlic powder
1 tablespoon olive oil

Directions:

Combine ingredients in a saucepan over medium heat. Simmer uncovered for approximately 15 minutes, stirring frequently. Refrigerate any leftover sauce.


Saturday, May 20, 2017

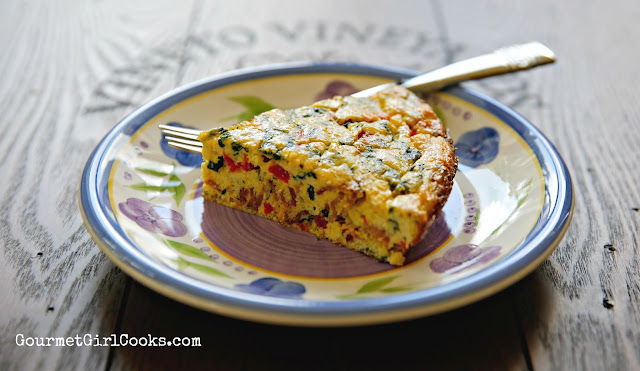
Saturday Brunch on the Porch - Veggie & Bacon Pie

Greetings, I've missed all of you. Long time no see, right? I'm not sure how many of you are out there any more since I disappeared a few months ago. I will fill you in on the details as to what's been going on soon, but not today. Today I want to focus on one of my favorite things...food blogging! And also because I know what you really want to see here is food, not hear about all of my "stuff." When I awoke this morning, I decided that today would be the today I returned to my blog. After 5 years of blogging almost daily...not doing so for these last few months has seemed like an eternity. It's a beautiful bright and sunny day here in Atlanta but unseasonably warm and humid. At least we are past the ridiculous pollen counts in the thousands though!

I decided to make a Veggie & Bacon Pie for brunch this morning and to sit out on the screened porch with the fan going to enjoy the cool morning before it got too warm. I snapped a few photos and included the easy peasy recipe below. I used the veggies I had on hand; baby spinach, red bell peppers, and Vidalia onions but you can use whatever you've got on hand. Also, you can omit the bacon or add cooked crumbled sausage instead. Enjoy!


Porch life...


He's my assistant food photographer and never far away when there's food around!

Veggie & Bacon Pie

Ingredients:


2 tablespoons olive oil or butter
1/2 cup onion, chopped
1/2 red bell pepper, diced
8 ounces cooked and chopped fresh baby spinach
8 large eggs
1/2 cup milk or cream
1/4 cup finely grated Parmesan cheese
1/2 cup crumbled feta cheese
1/2 cup blanched almond flour
1/4 teaspoon salt, to taste (optional)
1/4 teaspoon freshly ground black pepper, or to taste
8 slices cooked crumbled bacon

Directions:


Preheat oven to 350 degrees F. Lightly grease or spray a 10" deep dish pie plate (I used a 9.5" fluted pie dish). 

In a non-stick skillet, saute onions and bell peppers in olive oil or butter over medium heat until softened; transfer to a small bowl and set aside. In the same skillet, saute spinach, just until wilted.  Drain and press as much liquid out of cooked spinach as possible; coarsely chop the spinach and set aside.

In a medium bowl, add eggs, cream, Parmesan, feta cheese, almond flour, and salt and pepper to taste. Beat egg mixture together. Add onions, peppers, spinach, and bacon; stir until evenly combined. Pour mixture into greased pie dish and bake for approximately 40 minutes, or until puffed and golden and eggs are set and cooked. If the center is still slightly jiggly, cook for an additional few minutes (the center usually puffs up when completely cooked). Let cool for approximately 5 minutes; cut into wedges and serve. Makes 6 servings.