Monday, February 29, 2016

Flatbread Tacos - Low Carb & Gluten Free

This weekend was a busy one. We are doing serious spring cleaning and decluttering of our home. It's amazing how much "stuff" one collects over the years. We literally worked most of our waking hours and hope to finish up in the next couple of weeks.

On my way home this evening I thought about picking something up to grill for dinner since it was so warm out today but when I stopped at the store, I changed my mind and decided to make Flatbread Tacos using my low carb "Cheese Head Crust" as the flatbread base and then top it with taco seasoned ground beef (using my home made taco seasoning), shredded cheese, lettuce and tomatoes. We added sour cream, diced avocado and a bit of salsa to ours right before eating. It turned out really delicious. It was a cross between a taco and a pizza. You can top it with whatever you normally top your tacos with. The possibilities to top this flatbread/crust with are endless. I snapped a few photos below and included the easy peasy recipe. Enjoy!


Flatbread Tacos

INGREDIENTS:

8 ounces (2 cups) shredded mozzarella (whole milk or part skim)
3 ounces brick style cream cheese
1 cup almond flour
1/4 cup finely grated Parmesan (powdery style)
1/8 teaspoon salt
Dash garlic powder
1/2 teaspoon dried Italian seasoning
1 large egg
1 tablespoon olive oil (to oil hands before pressing out dough)
Cooked taco seasoned beef (1 pound ground beef cooked w/ my taco seasoning)
1 cup shredded cheddar or Mexican style cheese (I used Sargento Mexican Blend)
Desired toppings (diced tomatoes, shredded lettuce, avocado, sour cream, salsa, etc.)

DIRECTIONS:

Preheat oven to 425 degrees F. Line a large baking sheet or pizza pan with parchment paper.

Place mozzarella and cream cheese in a medium bowl. Heat cheese in microwave on high for 45 seconds; stir and heat an additional 30 to 45 seconds or until a hot melty mass of cheese is formed.

While cheese is melting in microwave, stir almond flour, Parmesan, salt, garlic powder and Italian seasoning together in a small bowl. Add flour mixture and egg to bowl of hot melted cheese. Working quickly, fold and stir mixture together with a rubber spatula until a ball of dough is formed (make sure cheese mixture is hot before adding flour and egg).   

Place ball of dough in center of parchment lined baking sheet. Oil hands with olive oil and press dough out into desired shape (round, oval or rectangular) until about ¼-inch thick (approximately 11" x 13"). Prick holes all over crust surface with a fork to prevent crust from bubbling up. Bake for 10 to 15 minutes or until golden brown (rotate pan half way through for even browning). Remove crust and top with cooked taco beef and shredded cheese; bake an additional 5 to 7 minutes or until heated through and cheese melts. Top with tomatoes, lettuce, etc. Cut into squares and serve with salsa or sour cream, if desired.


Thursday, February 25, 2016

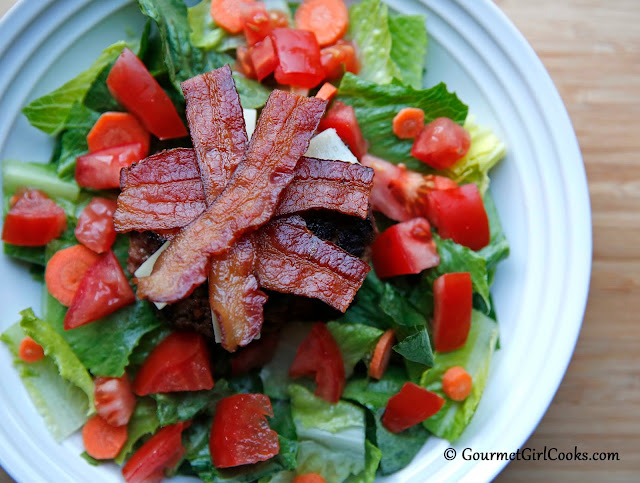
Bacon Cheeseburger Salad - Easy Low Carb

This evening I made a quick and delicious meal using a package of organic ground beef I picked up at Costco this past weekend. I formed it into 3 thick burgers after mixing it with a squeeze of "no HFCS" ketchup and yellow mustard, a generous sprinkle of McCormick's Chipotle Roasted Garlic Seasoning, and a sliced green spring onion. I heated a bit of coconut oil in my 10-inch Lodge cast iron pan and placed the patties into the skillet and cooked them until medium-well. I topped them with strips of sliced sharp white cheddar cheese and crispy bacon and placed the burgers on a bed of fresh baby romaine lettuce and scattered a few slices of carrot and diced tomato on top. It was so delicious. We really enjoyed it and I have one burger leftover for tomorrow's lunch! I snapped a few photos below and included the easy peasy recipe. Enjoy!


Bacon Cheeseburger Salad

Ingredients:

1-1/3 pounds ground beef (I used 85% organic ground beef)
1 rounded tablespoon ketchup
2 tablespoons yellow prepared mustard
1/2 teaspoon McCormick's Grill Mates Chipotle & Roasted Garlic Seasoning (or substitute salt and pepper to taste)
1 green spring onion, sliced (or finely diced regular onions to taste)
1 tablespoon coconut oil
6 strips crisp cooked bacon
3 slices sharp cheddar cheese
6 cups chopped romaine lettuce
1 medium tomato, diced
1 small carrot, thinly sliced

Directions:

In a medium bowl, combine ground beef, ketchup, mustard, chipotle seasoning, and onions. Form mixture into 3 equal sized patties, about 1-inch thick. Heat oil over medium-high heat in a heavy 10-inch skillet. Cook patties to desired doneness, about 5 to 7 minutes per side. Top with cheese and bacon. Place patties on top of lettuce in large shallow bowls. Scatter tomatoes and carrots on top.


Tuesday, February 23, 2016

CHEESE HEAD PIZZA - My Take on Fat Head Low Carb Pizza

This evening I took on a challenge to put my take and spin on the classic low carb "Fat Head" pizza crust recipe (fat head as in the Fat Head movie, a comedy by Tom Naughton). Essentially, it's a pizza crust made of predominantly mozzarella cheese, a little bit of cream cheese, almond flour, an egg and some spices. Sounds a bit gross now, doesn't it? Surprisingly though, its not...it's actually good and my version is super good (if I don't mind saying so myself).

Now, I have already created my share of amazing low carb pizza crust recipes, but when given the challenge, I decided to put my GGC spin on this one by cheese-ifying it (is that even a word)?  So, I proceeded to bump up the mozzarella by 25%, triple the cream cheese, add Parmesan cheese, bump up the almond flour...and it produced one of the most AMAZING crusts EVER! Pfffffft....this was no "fat head" pizza crust...this was CHEESE HEAD pizza crust! I always say...go big (cheese) or go home!

Since I am the only grain-free, low carb person in the house, the true test is always when one of my "regular eating" family members gives one of my new recipes a "thumbs up". Well, hubby did exactly that...he actually gave it a "2 thumbs up" and said it was one of my BEST pizza crusts EVER. Its a crust that you can pick up and hold with your hands (as are most of my other pizza crust recipes)...but this one is also flexible and foldable in a way that only someone either from or who has lived in New York before would know. My hubby just happened to have lived in New York for over 20 years...so when HE says its a great pizza crust and the best ever, that REALLY means something!!! This crust is filling and even though it's delicious, you will find that you can't keep stuffing your face with it like you can regular pizza. A slice or two will do just fine. My pizza crust recipe made a large 11" x 13" oval pizza that I simply pressed out onto a parchment lined baking sheet with oiled hands until 1/4-inch thick. I topped my pizza with Muir Glen's organic pizza sauce, shredded Sargento mozzarella cheese, Fiorucci uncured pepperoni and some sauteed red bell peppers and onions. It was absolutely amazing! I got 8 nice slices from it. I snapped a few photos below (with my cell phone believe it or not). Enjoy!


Dough is spread to 1/4-inch thick
Crust fresh out of the oven (about 13 minutes)
Pizza sauce is spread
Cheese and pepperoni added
Peppers and onions added...ready for the oven
Fresh out of the oven
BOOM..Cheese Head Pizza!

CHEESE HEAD PIZZA – My Take on Fat Head Pizza

INGREDIENTS:

8 ounces (2 cups) shredded mozzarella (whole milk or part skim)
3 ounces brick style cream cheese
1/4 cup finely grated Parmesan (powdery style)
1/8 teaspoon salt
Dash garlic powder
1/2 teaspoon dried Italian seasoning
1 large egg
1 tablespoon olive oil (to oil hands before pressing out dough)
Desired toppings (pizza sauce, pepperoni, cooked peppers, onions, mushrooms, additional cheese, etc.)

DIRECTIONS:

Preheat oven to 425 degrees F. Line a large baking sheet or pizza pan with parchment paper.

Place mozzarella and cream cheese in a medium bowl. Heat cheese in microwave on high for 45 seconds; stir and heat an additional 30 to 45 seconds or until a hot melty mass of cheese is formed.

While cheese is melting in microwave, stir almond flour, Parmesan, salt, garlic powder and Italian seasoning together in a small bowl. Add flour mixture and egg to bowl of hot melted cheese. Working quickly, fold and stir mixture together with a rubber spatula until a ball of dough is formed (make sure cheese mixture is hot before adding flour and egg).   

Place ball of dough in center of parchment lined baking sheet. Oil hands with olive oil (*see note/updated instructions below) and press dough out into desired shape (round, oval or rectangular) until about ¼-inch thick. Prick holes all over crust surface with a fork to prevent crust from bubbling up. Bake for 10 to 15 minutes or until golden brown (rotate pan half way through for even browning). Remove crust and top with pizza sauce, additional cheese, and any desired toppings. Bake an additional 5 to 7 minutes or until heated through. 

*Note/Update: Rather than oiling hands with olive oil to press dough out, a much easier (and less messy) way to press it out is to pour the tablespoon of olive oil on top of the dough after placing it in the center of baking sheet and use a rubber spatula to press and spread the dough out evenly. If necessary, lightly oil the rubber spatula to keep from sticking.


Friday, February 19, 2016

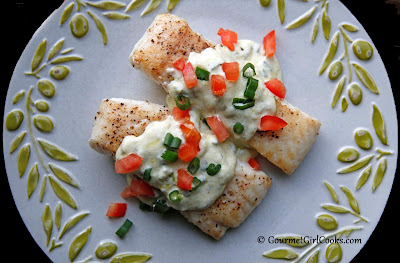
Pan Seared Wild Pacific Halibut w/ Poblano Cream Sauce

This evening I was finally got a chance to prepare my halibut for dinner (it was still frozen solid last night so I made Pizza Style Skillet Chicken instead). Wild Pacific halibut is one of my favorite kinds of fish (besides wild Alaskan Copper River Salmon). It's a mild tasting solid piece of fish and is delicious simply pan seared in butter or olive oil with a bit of salt and pepper. It also takes well to any type of sauce. I wanted to change it up a bit and make a new sauce this evening. As I poked around my fridge I came across a Poblano pepper...and my mind instantly began thinking "Poblano Cream Sauce". If you've never had Poblano peppers before, they have a tiny bit of heat but are pretty mild overall with a nice flavor. I actually prefer them to regular green bell peppers. The sauce turned out absolutely delicious. It added a delicate Mexican-ish flavor without overpowering the halibut which is important because you don't want to compete with its delicate flavor. The halibut itself only takes 6 to 7 minutes total to pan sear and the sauce is easy to make and takes about 15 minutes, most of which is the time that it takes to saute the Poblano peppers until tender. This sauce would go excellent over chicken as well. I snapped a few photos below and included the easy peasy recipe. Enjoy!


Pan Seared Wild Pacific Halibut w/ Poblano Cream Sauce

Ingredients:

4 4-ounce wild halibut fillets (or other thick meaty white fish), approximately 1 pound
2 tablespoons olive oil
Sea salt and black pepper
1 to 2 tablespoons butter
1 small Poblano pepper, seeded and finely diced
1 green spring onion, thinly sliced
1 ounce "brick style" cream cheese, softened
1/2 cup cream or milk
1/4 teaspoon sea salt
1 rounded tablespoon sour cream
1 teaspoon lime juice (or lemon juice)
1 small diced tomato, optional

Directions:

Heat olive oil in a 10-inch nonstick skillet over medium-high heat. Season halibut fillets with salt and pepper, to taste. Cook approximately 3 minutes per side until lightly browned. Transfer to a plate and cover with foil to keep warm. 

While halibut is cooking, add butter to an 8-inch nonstick skillet over medium heat. Saute Poblano peppers and onion until tender, about 8 to 10 minutes. Reduce heat to low and add the cream cheese to skillet, stirring with a spoon or rubber spatula until it begins to melt. Add cream or milk, 1/4 cup at a time, whisking and blending into the cream cheese mixture. Season with salt and cook over low-medium heat just until sauce begins to bubble, stirring frequently. Stir in sour cream and lime juice; taste for seasoning. Serve halibut topped with Poblano Cream Sauce; top with diced tomatoes, if desired. 


Thursday, February 18, 2016

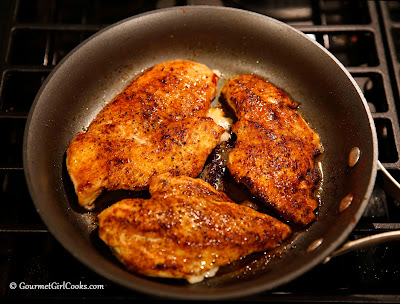
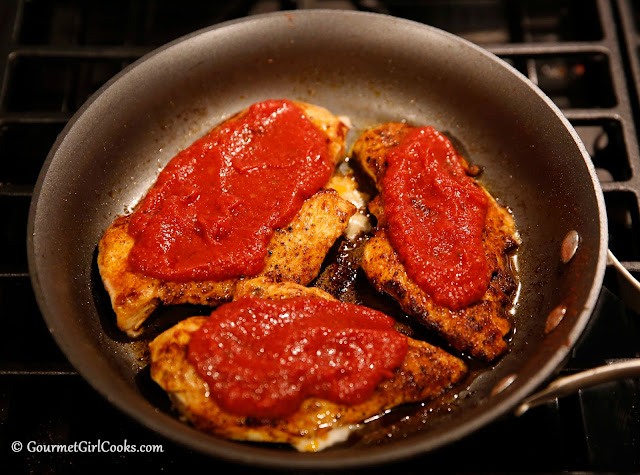
Pizza Style Skillet Chicken - Low Carb

This evening I stopped at Sprouts Farmers Market on my way home and picked up a few things. My original plan was to prepare halibut for dinner that I had put in the fridge to thaw, but my thick fillets were still frozen solid when I got home. Luckily I picked up some chicken cutlets while I was at Sprouts so I could re-group and come up with an alternate plan for dinner.

I put together a quick and delicious low carb meal in a little under 30 minutes and it turned out so good. I seasoned 3 large 1/2-inch thick chicken cutlets with salt, pepper and paprika, then browned them in olive oil in an ovenproof skillet until they were golden. I topped them with Muir Glen's organic pizza sauce, sliced mozzarella cheese, Fiorucci's uncured pepperoni and then popped them under the broiler for a few minutes while I sliced up a fresh ripe organic tomato. I removed my skillet, topped the cutlets with the sliced tomatoes, drizzled them with olive oil and then topped them with shaved Parmesan cheese and popped the skillet back under the broiler for a few more minutes until everything was melted and bubbly. I added some sauteed sliced mushrooms and sliced green onions on top and dinner was ready. We had Pizza Style Skillet Chicken...it was unbelievably good and the chicken was melt in your mouth tender. I snapped some photos of the easy steps and included the easy peasy recipe as well. You MUST try this dish...it's hard to believe that something this simple to prepare tastes so good. Enjoy!


Take a peek inside my Pizza Style Skillet Chicken

Pizza Style Skillet Chicken

Ingredients:

3 large chicken cutlets, 1/2-inch thick (approximately 1-1/4 lbs.)
Salt and pepper, to taste
Paprika
4 tablespoons olive oil, divided
1/3 cup pizza sauce
3 slices mozzarella cheese
6 large slices pepperoni (or enough regular size pepperoni to cover chicken)
1 medium tomato, sliced into 6 thin slices
3 tablespoons shaved or shredded Parmesan
Favorite pizza toppings (sauteed mushrooms, peppers, onions, olives, etc.), optional

Directions:

Season chicken cutlets with salt and pepper; sprinkle with paprika. Heat 3 tablespoons olive oil in a 10-inch oven proof skillet over medium-high heat. Add chicken cutlets and cook approximately 5 minutes per side, or until browned and cooked through. Top each cutlet with pizza sauce; mozzarella; and pepperoni. 

Preheat broiler. Place ovenproof skillet under broiler and cook for 3 to 4 minutes, or until mozzarella cheese begins to bubble. Remove skillet from oven; top each cutlet with 2 slices of tomato and drizzle with remaining tablespoon olive oil. Top with Parmesan. Return skillet to oven and broil for an additional 2 to 3 minutes, or until Parmesan is melted. Remove and top with your favorite pre-cooked pizza toppings, if desired. 

*Note: If you don't own an ovenproof skillet, saute chicken cutlets in a regular skillet until cooked, then transfer to a casserole dish to complete the cooking under broiler. 


Saturday, February 13, 2016

Saturday's Breakfast - Grassmilk Yogurt and a Few Other New Finds

This morning I decided to try a new yogurt for breakfast that I found last week at Sprouts Farmers Market. It's made by Organic Valley and is made using 100% grass-fed milk (no grains). It even has a thick layer of cream on top that you stir in! I sweetened it with a bit of stevia and tossed a few fresh blackberries on top. I found this yogurt to be a nice change from my usual Greek yogurt. It was smooth, creamy and noticeably less tangy and tart. I also snapped a few photos of a couple of my recent Costco finds. I picked up a 5-pound container of Himalayan Pink Sea Salt (I almost exclusively use pink Himalayan salt). I liked it because besides being a good price ($9.99), I like that it comes in a nice wide mouth jar as well. I also was excited to find that Costco now carries Muir Glen Organic Fire Roasted San Marzano Style Tomatoes. They come in a 4-pack of large 28-oz cans (particularly handy when making a big pot of chili). I snapped a few photos of this morning's blackberry topped yogurt below. Enjoy!


Sprouts Farmers Market find


A recent Costco find
Another Costco find!


Monday, February 8, 2016

Chilly Willy Chili Perfect for this Chilly Winter Night

This evening we enjoyed a nice hot bowl of my Chilly Willy Chili which hit the spot because it is super chilly here tonight with snow flurries in our forecast. I actually made a big pot last night (double batch with extra meat) for Super Bowl. I modified it slightly by adding a couple of diced carrots as well as 1 can of kidney beans to the big pot since hubby and my son prefer it with beans (just leave them out for very low carb chili). It was filled with organic ground beef, fire roasted tomatoes, red bell peppers, poblano peppers, jalapeno peppers, onions, diced zucchini and spices. It turned out great. I made a batch of my Parmesan Biscuits to go with it. We topped our chili with shredded sharp cheddar and a little dollop of sour cream. It was even better tonight after sitting overnight in the fridge. I snapped a quick photo below. Enjoy!


Saturday, February 6, 2016

BEST LOW CARB PIZZA - A Collection of 6 Amazing Pizza Crust Recipes

When I first went wheat free (grain free, gluten free, and low carb) 3-1/2 years ago, the one thing I missed the most was pizza. Even though there are plenty of low carb pizza recipes found online, I personally found most of them sub par at best and just not what my idea of pizza was. I didn't want to settle for "so-so" or "it's better than no pizza". So, I got busy at creating my own pizza crust recipes. To say that it changed my outlook (for the good) on being able to maintain this way of eating long term is an understatement. Most importantly, it kept me from feeling deprived (which is the kiss of death for most dieters). If you feel deprived, it equates to punishing yourself and who wants to do that forever? Mentally, this was a significant turning point for me and my positive attitude to making low carb eating a lifestyle and not just a phase. Thus far, it's been 3-1/2 years and going strong.

To make it easier to find my pizza crust recipes in one place, I've put together a collection of 6 of my (different) low carb pizza crust recipes. I have a variety of different crusts to suit different tastes. Whether you are looking for nut free, flax free, crispy or deep dish style, I hope you find one (or more) to suit your tastes. You might be surprised to find them better than you ever imagined a low carb pizza crust could be. These are pizzas that you can pick up and eat with your hands just like regular pizza (in other words, no fork required). If you haven't tried any of my pizza crust recipes yet, I would recommend starting with one of my Herbed Pizza Crust recipes (either the regular or flax free version). They are simple to make and delicious. It's time to put delicious low carb REAL pizza back on your Friday night menus again. Check out my collection below (the recipe to each is located on the link below each large photo). Enjoy!


Click on the title under each photo for the recipe

Herbed Pizza Crust

Chicago Style Deep Dish Pizza

Cauliflower Crust Pizza

Herbed Pizza Crust (No Flax)

Low Carb Pizza Crust (Nut free)

Low Carb Pizza Crust w/ Zucchini

Here are just a few of my most memorable pizzas...

"Pizza at the Beach...Vacation Pizza is always best!"