Pages

Thursday, April 30, 2015

Panna Cotta Ricotta - Low Carb & Sugar Free

This week I created a new recipe for low carb, sugar free Panna Cotta. It turned out AMAZING! If you've never made, eaten or heard of Panna Cotta before, it's a simple Italian dessert usually made with cream, eggs and a sweetener (panna cotta means cooked cream). It is sometimes cooked in a water bath (bain-marie), cooled and then inverted over top of some type of sauce or berry puree for a fancier presentation. While I like my food to look good, I am also all about keeping it as simple as possible to prepare, otherwise it would end up being another one of those recipes banished to serving only for special occasions. In other words, lets "keep it real" as in real food, real simple, real good!

I just happened to have a huge (2-pound container) of ricotta cheese in the fridge that was 3/4 full and needed to be used. Ricotta doesn't have a long shelf life once it's opened and unless I am making lasagna or something like that, I'm always looking for ways to use up what's left. I had recently stumbled upon a recipe for Panna Cotta made using ricotta cheese and cream (instead of using all cream like more traditional versions). This version also used a bit of unflavored gelatin to help it set instead of eggs and it required no cooking other than the few minutes it takes to heat it up on the stove to dissolve the gelatin. This also means it will make a perfect summertime dessert because you don't need to turn your oven on and the berries, which go nicely with it, are plentiful in the summer as well. I served mine in mini trifle bowls topped with fresh Strawberry Chia Jam that I made by simply mashing ripe freshly picked strawberries (given to us by one of our kind and generous neighbors over the weekend) with chia seeds and a bit of stevia (it was delicious and so fresh)! 

This panna cotta recipe is SO astoundingly delicious...as in, I didn't expect it to be so good for something so easy and with such few ingredients. It's like a cross between a thick and rich custard, a cheesecake...and it has the familiar flavor of my favorite tapioca pudding (minus the tapioca)! To keep the carbs down, I used unsweetened cashew milk in place of the cream (which only add 1.5 grams of carbs to the entire recipe). I used Swerve confectioners style sweetener to sweeten it and fine tuned the sweetness with stevia

This easy dessert recipe met my 3 basic criteria that I try to stick to most of the time (with a 4th bonus criteria added as well):

#1  Is it low carb?                                                                           Check!
#2  Does it taste good?                                                                   Check!
#3  Is it simple enough that people will actually make it?              Check!
#4  Will it help me use up this ginormous container of ricotta?      Ding Ding Ding!

This dessert is definitely worthy of trying. Depending on what kind of ricotta you use, each serving has 2 grams of carbs and 2 grams of sugar. It's simplicity and taste might make this one of your absolute favorites. It's definitely become one of mine! I will never ever worry about what to do with my leftover ricotta again...as a matter of fact I will be buying it just to make this delicious Panna Cotta Ricotta! Enjoy!


Panna Cotta Ricotta

Ingredients:

1 envelope Knox unflavored gelatin (or 2-1/2 teaspoons unflavored gelatin)
1 1/2 cups unsweetened cashew milk (or half-and-half), divided
1/2 cup confectioners style Swerve sweetener (or powdered sweetener)
1 tablespoon NuStevia simple syrup (or liquid stevia, to taste, added after blending)
1 teaspoon vanilla extract
2 cups ricotta cheese
1 cup Strawberry Chia Jam, pureed fresh or frozen berries, or fresh fruit

Directions:

In a medium saucepan, sprinkle gelatin over 1/2 cup of the milk; let sit about 5 minutes until softened. Add remaining 1 cup of milk, powdered sweetener, stevia, and vanilla. Heat until hot and gelatin is dissolved, stirring frequently (careful not to boil).

Place ricotta and gelatin mixture in a blender or food processor and blend until pureed and smooth, about 1 to 2 minutes. Divide and pour mixture equally among 8 custard cups or dessert cups. Refrigerate and chill until set, about 3 hours. Top with jam or pureed berries before serving, if desired.

*Note: If desired, the additional stevia can be added at the end during the blending process to allow you to adjust sweetness to your taste after ricotta has been added.


Wednesday, April 29, 2015

Chocolate Chip Shortbread Cookies - Low Carb & Gluten Free

Last week, I shared my recipe for basic Shortbread Cookies that I debuted on a guest post I did for Honeyville. The cookies are buttery, not overly sweet and delicious. It's a great base recipe to use to make numerous cookie variations with. Besides frosting or glazing them, or making cute little cut out cookies, it's also super easy to simply fold other goodies into the basic cookie dough (dried fruits, nuts, chocolate chips, etc.). Click here to see the photos of the basic cookies: Shortbread Cookies.

I whipped up another batch of cookies, and this time I decided to make a Chocolate Chip Shortbread Cookie variation. I simply folded about 1/4 cup of 70% cacao dark chocolate chips into the dough. Oh my...these made the most awesome buttery chocolate chip cookies, and they are so easy to make as well! To make this version, simply click here to get my basic Shortbread Cookie dough recipe and fold in some chocolate chips, then bake and enjoy them. Click here for the recipe: Basic Shortbread Cookie Recipe. Enjoy!


Tuesday, April 28, 2015

Impossibly Easy Taco Pie - Low Carb & Gluten Free

This evening I decided to modify the Bisquick recipe for their Impossible Taco Pie. I recently came across their gluten free version using their gluten-free mix. However, for those of us that are also low carb and trying to stay away from packaged commercial "gluten-free products", that isn't a healthy option for us, so I created my own. Their packaged version contains rice flour, sugar, modified potato starch, etc.

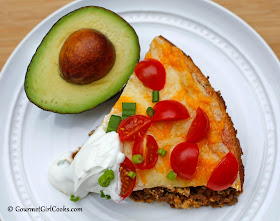
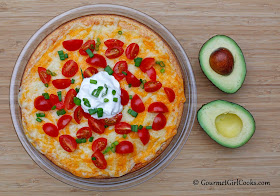
I've been successfully experimenting the last few years with my own low carb take on their "impossible pies" by replacing it with almond flour and some other ingredients instead of Bisquick mix, I decided to go ahead and do the same for their taco pie. It turned out AMAZING and so tasty. It was super easy to make, too. I used my own recipe for taco seasoning, but you can use your own in place of it if you prefer. My version is made with real food and it doesn't contain any wheat, grain, gluten, sugar or additional starches. I topped the taco pie with quartered fresh cherry tomatoes, sliced green onions and sour cream. I served it alongside half of a fresh avocado. This dish would make a perfect weeknight "Cinco de Mayo" meal for next week. Check out my recipe and photos below. Enjoy!


Impossibly Easy Taco Pie

Ingredients:

1 pound ground beef (I used ground sirloin)
3 sliced green spring onions
1 recipe for Taco Seasoning (recipe below), or 1-ounce package gluten-free taco seasoning
1 4-ounce can diced green chiles, drained
2 large eggs
1/2 cup ricotta cheese
1/2 cup half-and-half or milk
1/2 teaspoon baking powder
1/2 cup blanched almond flour
Pinch salt
1 cup shredded cheddar cheese
1/2 to 3/4 cup diced fresh tomatoes
Optional Garnishes: sour cream, salsa, sliced green onions, sliced olives, avocado, salsa, etc.

Directions:

Preheat oven to 400 degrees F. Lightly spray or grease a 10-inch glass pie dish and set aside.

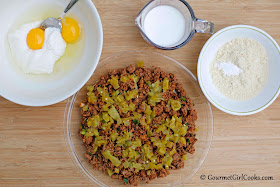
Brown ground beef over medium high heat until no pink remains; add sliced green onions and cook an additional 1 to 2 minutes. Stir in taco seasoning. Spoon beef into pie dish and spread out evenly. Top with green chiles.

In a medium bowl, beat eggs with ricotta until creamy. Add half-and-half, baking powder, almond flour and salt, whisking together until smooth. Evenly pour mixture over beef and chiles. Bake for 25 to 30 minutes or until done. Top with cheese and bake an additional 3 to 4 minutes until cheese is melted. Remove from oven and top with diced tomatoes.  Let sit 5 to 10 minutes before cutting into wedges and serving. Garnish as desired.

*Taco Seasoning Recipe 
  Combine the following:
    2 teaspoons chili powder
    1/4 teaspoon garlic powder
    1/4 teaspoon onion powder
    1/4 teaspoon cayenne pepper (or to taste)
    1/4 teaspoon dried oregano
    1/4 teaspoon paprika
    1 teaspoon ground cumin
    1/2 teaspoon sea salt
    1 teaspoon black pepper


Sunday, April 26, 2015

Grilled Lemon Rosemary Chicken & Parmesan Cauliflower Mash

This evening both my sons came for dinner. We had Grilled Lemon Rosemary Chicken. It's so easy to make. I mixed about 1/2 cup of freshly squeezed lemon juice, the zest of 1 lemon, about 1/2 cup of olive oil, about 1 tablespoon Greek Seasoning (by Penzey's Spices), a sprig of fresh rosemary, salt and pepper. I placed boneless chicken breasts in a large Ziploc bag and poured the marinade over; sealed out all the air and tossed it in the fridge for the afternoon. We grilled them over a medium-hot grill for about 6 minutes per side. They turned out delicious and flavorful. This marinade would also work nicely on bone-in chicken pieces, too.

To go with our grilled chicken, I made my rich and thick Parmesan Cauliflower Mash which is unbelievably good. It's rich, thick, creamy and so delicious; I actually like them better than mashed potatoes. I served cooked sliced buttered carrots alongside our meal. I don't eat them often and keep it to smaller portions since they have more carbs than green veggies. It was a delicious meal. I snapped a couple photos below. If you'd like my recipe for Parmesan Cauliflower Mash, click on this link here: Rich & Thick Parmesan Cauliflower Mash. Enjoy!


Saturday, April 25, 2015

Saturday's Low Carb Breakfast Plate - No Denny's Required

Here's this morning's breakfast that we enjoyed in between rounds of storms. It was great to sleep in for a change this morning. We had heavy storms this morning and are expecting the stronger storms to roll through later this afternoon so we are going to scoot out and run a few errands before that happens.

I snapped a quick photo of breakfast; scrambled eggs with cheese, cripsy bacon, Cheddar Black Pepper Biscuits and some fresh strawberries. So simple and so good. This low carb breakfast doesn't look much different than one full of carbs, does it. Enjoy!


Thursday, April 23, 2015

NEW RECIPE ALERT: Shortbread Cookies (Low Carb, Sugar & Grain Free)

I'm excited to share my new recipe for basic Shortbread Cookies. A number of you have asked me for a good basic shortbread recipe. I'm sharing that recipe today on my guest post for Honeyville. These cookies turned out awesome and are so very easy to make and they use very few ingredients.

I used my favorite Honeyville's blanched almond flour, Kerrygold butter, Swerve confectioner's sweetener and a couple of other ingredients. Shortbread cookies are a basic butter cookie that are usually not too sweet. However, they can be dressed up to become the most decadent cookie if you choose to by simply stirring other ingredients into the batter, glazing them, flavoring the dough, frosting or cutting them out into all kinds of cute shapes (dipping them in melted chocolate would also be awesome). I chose to keep them simple because that way you have no excuse not to try them...and seriously, if you can make something that tastes yummy and it's also easy to make, why would you ever choose something more complicated? These cookies are easy to make, delicious, and can be simple or elegant depending on how you choose to make them. After mixing my dough together, I rolled it into a log, wrapped and chilled it until firm and then "voila"...slice and bake cookies! I really love these cookies and look forward to transforming them into all kinds of yummy treats. Check out these beauties below. To get the recipe, just click here: Shortbread Cookies. Enjoy!


Tuesday, April 21, 2015

Italian Style Sausage & Spinach Pie - Low Carb

This evening I made an Italian Style Sausage & Spinach Pie that was low carb, wheat free, gluten free and yummylicious! It's filled with browned hot Italian chicken sausage (removed from the casings), sauteed baby spinach, organic oven roasted tomatoes, ricotta, mozzarella and Parmesan cheeses...so what's not to love? It's held together with a batter made with eggs, ricotta, half-and-half and almond flour which gives it a different texture than a traditional "eggy" quiche. It forms a moist bread-like crust that holds all the delicious fillings in place. It turned out delicious and will provide a quick and easy lunch for me for the rest of the week. I snapped a few photos of this evening's "pie" below. Eating low carb and wheat free is so delicious. Enjoy!


Italian Style Sausage & Spinach Pie

Ingredients:

1/2 pound cooked crumbled sausage (I used hot Italian chicken sausage)
8 ounces fresh baby spinach, wilted, drained and coarsely chopped
Pinch red pepper flakes, optional
3 tablespoons oven roasted tomatoes packed in oil (or sun dried tomatoes)
1 cup shredded mozzarella cheese
1/2 cup ricotta cheese
6 large eggs
1/2 cup half-and-half (or cream)
1/2 teaspoon baking powder
1/2 cup blanched almond flour
1/4 cup shredded Parmesan cheese

Directions:

Preheat oven to 350 F degrees.  Lightly spray a deep dish 10-inch pie dish with olive oil spray.  


In the prepared baking dish, add layer of sausage; top with layer of spinach and season with red pepper flakes. Add tomatoes and top with mozzarella cheese. 

Whisk ricotta cheese in a medium bowl until smooth. Beat in eggs and half-and-half; whisk in baking powder and almond flour until smooth. Pour batter mixture evenly over the top of sausage and spinach mixture. Gently jiggle pie dish back and forth to help batter work down through the filling. Top with Parmesan cheese and bake for 40 minutes or until puffed and light golden brown. Pie is done when a knife inserted into the center comes out clean. Let sit about 5 minutes before cutting.

*Note: For a less spicy pie, use mild sausage and omit red pepper flakes.


Sunday, April 19, 2015

Chicken & Broccoli Stir-Fry - Low Carb "Real Food"

This evening I made Chicken & Broccoli Stir-Fry for dinner since it was just youngest son eating with us and his 2 favorite foods just happen to be chicken and broccoli! Hubby and son ate theirs over rice and I ate mine as is and topped it with a few roasted peanuts. It was delicious and so simple to make. It's been an extremely rainy week and weekend, so it was nice when late this evening the sun popped out for about an hour. I took advantage of the sun and stepped out and snapped a few photos of some flowers in the yard. If you'd like the basic recipe for my stir-fry, particularly the sauce part (it can be used for just about any type of beef, chicken or shrimp and veggie stir-fry), click on this link here: Quick & Easy Stir-Fry. Enjoy!


Thursday, April 16, 2015

Easy Grilled Chicken 7 Superfood Salads - Keeping it Real (Food)

This evening I made a quick and easy dinner by using a bag of my favorite "7 Superfood Salad" blend made with kale, brussels sprouts and a number of other veggies. I topped with the Chipotle Grilled Chicken Cutlets I made a couple of nights ago (chicken cutlets spritzed with olive oil and seasoned with chipotle seasoning before grilling). I cooked the cutlets alongside the Bacon Double Cheeseburgers I made so I could cook a couple of meals at once. I grilled enough chicken cutlets to enjoy grilled chicken sandwiches last night and for the delicious and quick salads this evening. I will say, though, that tonight would have been a much better night for soup considering we didn't get above 55 degrees here today! It was quite chilly to say the least after the unusual heat wave we experienced just days ago. We have rain in our forecast throughout the week. I snapped a quick photo of our delicious salads below. Eating low carb "real food" can be as easy as you want or need it to be and you don't have to cook every single night to "keep it real." Enjoy!


Tuesday, April 14, 2015

Bacon Double Cheeseburgers a/k/a Grain-Free Baconators

This evening I decided to grill a couple of different meals at the same time since we already had the grill heated up. It's supposed to rain most of this week and it looked as though it could rain this evening so we went ahead and grilled both tonight's and tomorrow's dinner to make things easier. I was in the mood for burgers tonight so as soon as I got home, I whipped up a batch of my Sesame Seed Sandwich Buns. They only take 30 minutes to make from beginning to end (including the 22 minutes to bake them). They are the closest thing to regular bread I've had in almost 3 years of grain-free eating and I use them for burgers, grilled chicken sandwiches, deli sandwiches, chicken salad sandwiches and even breakfast sandwiches. They are so versatile and easy to make.

I made plain hamburgers using ground round lightly seasoned with McCormicks Montreal Steak Seasoning and grilled them for about 4 to 5 minutes per side. I decided to make bacon cheeseburgers so while my sesame seed buns were baking, I cooked some bacon until crisp. I topped the grilled burgers with sliced sharp white cheddar cheese and a few strips of crispy bacon. I kept it simple and served the burgers with a few grape tomatoes and half of an avocado. They turned out delicious! If you have been craving a burger on a bun or just a simple sandwich for lunch...these are the perfect sandwich rolls to use and each roll contains 4.5 to 5 net carbs and they bring back the convenience of portability (as in pack a quick sandwich for lunch). I snapped a few photos below. The recipe for my sandwich rolls can be found here: Sesame Seed Sandwich Buns. Enjoy!


Sunday, April 12, 2015

Sunday Night's "Pasta" Dinner - Low Carb

This evening both boys came for dinner. I made "pasta" by using my Paderno Spiral Vegetable Slicer to make the noodles with yellow summer squash. To make the sauce, I diced about 1-1/2 pounds of boneless chicken breast and sauteed it in olive oil just until it began to turn opaque and then added half of a diced red bell pepper, 2 sliced medium zucchini and cooked it until the veggies were almost tender and then tossed in some sliced fresh mushrooms and cooked everything until the juices cooked off. I poured a jar of DelGrosso'a Fireworks Sauce over the chicken and veggies, added a few pinches of red pepper flakes and simmered it uncovered on low heat for about 45 minutes to meld all the flavors, tenderize the chicken breast and thicken the sauce. I served it over the lightly sauteed veggie pasta and topped it with shredded Parmigiano Reggiano. It turned out delicious. I snapped a couple photos below. If you'd like to see my post where I showed how I make "non-watery" zoodles/noodles, click here: How to Make Non-watery Zoodles. Enjoy!


Here's a pic of the Easter Basket Spike's brother (youngest son) got him


Saturday, April 11, 2015

It's Shortcake Season - Low Carb Blueberry Shortcake & Strawberry Shortcake

It was a beautiful bright and sunny day here today which was welcomed after yesterday's nasty stormy weather. A number of you have asked for my Strawberry Shortcake recipe that I made for dessert on Easter. While I already had it written out, I wanted to make it one more time and tweak it just a little. I wanted it to be the right texture for a shortcake that's going to soak up berry juice and whipped cream. I didn't want it to be too dry or too moist. So, I made it again today with a couple of minor modifications. I also made a Blueberry Shortcake version today...and I must say, I didn't know what I was missing! I don't believe I've ever just made a Blueberry Shortcake before but I think I liked it better than Strawberry Shortcake!

When I made the Strawberry Shortcake last week, I lightly sweetened sliced fresh strawberries and let them sit in the fridge until assembly and serving time. When I made today's Blueberry Shortcake, I didn't add any sweetener to the blueberries. I simply split my mini shortcakes in half and placed the bottom half on a plate, topped it with lightly sweetened whipped cream, scattered fresh blueberries on top; placed the top half on and added more whipped cream and few more blueberries. It was awesome! You could make it with raspberries, blackberries or a mixture of a variety of berries...whatever you have on hand or is your favorite. You could mash a few berries, too, if you wanted to make a little juice to drizzle on top. I snapped a photo of this evening's Blueberry Shortcake along with a photo of last week's Strawberry Shortcake. I used my USA Pan 6-well mini cake pan to make these and they make the perfect size shortcakes. If you wanted to make a smaller dessert, just make a single layer using half of a mini-cake and top with berries and whipped cream rather than making a double decker. The recipe for the shortcake is below as well as a few yard pics. Enjoy!


Azaleas are blooming...it finally looks like spring
Viburnum is one of my favorite spring shrubs
The hostas are poking out of the ground

Fresh Berry Shortcake

Ingredients:

2 cups sifted blanched almond flour

2/3 cup granular or confectioners Swerve sweetener (I used confectioners)
1/4 cup plain unsweetened whey protein powder
1 teaspoon baking powder
1/4 teaspoon baking soda
1/4 teaspoon salt
4 large eggs 
6 tablespoons melted butter   
2 teaspoons vanilla extract
1/2 cup buttermilk
4 teaspoons NuStevia Simple Syrup (or additional stevia, to taste)
Fresh strawberries, blueberries or other berries
Whipped Cream

Directions:

Preheat oven to 350 degrees F. Grease a 6-well mini cake pan with butter or coconut oil and set aside.  


In a large bowl, whisk together almond flour, granular or powdered sweetener, whey protein powder, baking powder, baking soda and salt in a large bowl.


In a separate bowl, beat eggs, butter, vanilla, buttermilk and stevia together. Add liquid mixture to dry mixture and stir just until combined. Beat for 2 minutes with a hand mixer at medium-high speed until light and smooth.  


Divide batter evenly among 6 cake wells. Bake for 23-25 minutes until golden and a toothpick inserted in the center comes out clean. Let cool in pan for 5 minutes; invert onto a wire rack and let cool completely. Slice in half crosswise and top bottom half with berries and whipped cream; place remaining half on top and add additional whipped cream and berries.


*Note: Cakes can also be cut in half and frosted or glazed as desired. 


Tuesday, April 7, 2015

Low Carb Pizza - Piled High w/ Toppings

This evening I was in the mood for pizza and it has been a while since I made it. I decided to make my crust recipe that's made using almond flour and ground chia. It's a delicious crust. I doubled the crust recipe to make a huge 14-inch pizza for hubby and I to share (it actually made a family sized pizza that filled my 14-inch USA Pan nonstick pizza pan).

I covered the entire pizza with sauce, diced fresh mozzarella, ground beef sausage (I made by browning ground sirloin, onions, garlic, salt, red pepper flakes, ground fennel and sage), and then topped with large sliced pepperoni. Then, I customized the final toppings by placing Kalamata olives and artichoke hearts on hubby's half and cooked mushrooms and diced red bell peppers on my half. It turned out amazing. I cut each half into 4 large slices (a total of 8 big slices for the entire pizza). The pizza was so full of toppings that hubby and I were only able to eat one slice each. We have plenty left for tomorrow and lunch for the next couple of days. I snapped a few photos below. The recipe for the pizza crust I doubled and used is here: Pizza Crust. Enjoy!