Pages

Saturday, May 31, 2014

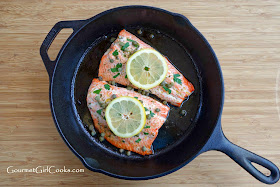
Skillet Roasted Wild Salmon w/ Lemon Garlic Herb Butter & Capers

Today I picked up some Copper River Wild Sockeye Salmon from Costco. I've been looking forward to having this for days now. It's my favorite kind of wild salmon. It is so simple to prepare and it doesn't take long to cook either. We had the last of our leftover Yellow Cheddar Squash Casserole that I made a few days ago to go along with our salmon. It was absolutely delicious. 

I like to oven roast my salmon and usually do it on a baking sheet. This evening, I decided to use my 10-1/2 inch cast iron skillet to cook my salmon. I cut the long fillet into 2 pieces. I put a little olive oil in the bottom of my skillet and began heating it over medium-high heat. While the skillet was heating, I melted 2 tablespoons of Kerrygold's Garlic & Herb Butter in a small bowl (it has garlic and parsley in it) and then stirred in the juice of half of a lemon (a couple teaspoons). 

I preheated my oven to 450 degrees F. When my skillet got hot, I placed the salmon in, skin side down, and let it cook for about 3 minutes to sear the bottom of the fillet. As it was cooking, I brushed the salmon with half of the lemon-butter mixture (pour or drizzle the butter over the fillets to brush on; don't dip the brush into the butter after it has made contact with the raw fish). I put the skillet into the 450 degree oven and reduced the temperature to 425 degrees. I roasted the salmon at 425 degrees for 12 to 15 minutes, (depending on the thickness of the fish). Remove from oven, add about 1 tablespoon of capers over top of the fish, if desired. Lightly cover with foil until ready to serve. Drizzle the remaining lemon herb butter over the salmon when serving. It is that simple! I snapped a few photos for you to see below. Enjoy!




Today's Costco Finds -- Check Them Out!


Check out today's Costco finds. The most exciting find today was what I went looking for and had hoped to find...Copper River Wild Sockeye Salmon! YAY!!! Ever since "Chris" told me she had gotten some a few days ago and was having that for dinner...I've been on a mission to find it this weekend. I picked up 3 large fillets because I was afraid it wouldn't be there when I went back for it next weekend, too. They also had some beautiful Australian lamb chops. They have some of the most beautiful lamb chops I've ever seen at Costco. I also picked up some heavy cream, a package of my favorite artisan romaine lettuce as well as big containers of fresh blueberries and raspberries. 

I've been making a lot of fresh lemonade recently, but I usually make it by the glass -- squeeze fresh lemon juice into my glass, add some liquid stevia and then fill my glass with chilled filtered water. I found a 2-pack of infusion pitchers and picked those up to make lemonade, limeade, iced tea and fresh fruit infused water to enjoy this summer. I'm looking forward to making it by the pitcher so it's always available. Last, but not least...I picked up a large gift set of Crabtree & Evelyn's "hand therapy" cream. There are 12 different varieties/scents and all of them sound wonderful. It comes in a beautiful gift tin covered with flowers and fruits. I just couldn't pass it up. Each of these tubes of hand cream retail for $8.00 each independently (or you can find the same set at Amazon for $53.50). Costco had this collection for $29.99 which is a fantastic price! I can not lie -- next to the Copper River Salmon find...this was my next favorite find of the day! Here's a link to the hand cream if you are interested in checking them out (it's the 25 g. tubes in the collection) ---> Crabtree & Evelyn Hand Cream Collection. So, if you like things like this (like I do)..check out your Costco to see if they carry the collection. Enjoy!


Friday, May 30, 2014

Deep Dish Pizza: A Grain-free Friday Night Special

This evening I was in the mood for pizza when I got home. I decided to make my Chicago Style Deep Dish Pizza. I like to cook this in my 10-1/2 inch Lodge cast iron skillet. Hubby and I prefer different ingredients on our pizza. Rather than make 2 separate pizzas like I frequently do, I decided to make one pizza and just make "half his / half mine." I put sauce, mozzarella cheese and Boars Head pepperoni on the entire pizza and then put kalamata olives on his half and red and yellow bell peppers and thinly sliced onions on mine. It turned out great and was the perfect meal to perk up this dark and dreary Friday night. There are thunderstorms here this evening and more rain in this weekend's forecast. I snapped a few photos of the pizza for you to see below. The link to the pizza recipe is here: Deep Dish Pizza. Enjoy!


The crust is baked and ready to be topped
The pizza is topped and ready to be baked to heat the toppings and melt the cheese


Wednesday, May 28, 2014

Grilled Chicken Parmesan -- Low Carb, Quick, Fresh & Simple

This evening I made a quick dinner. I had 2 boneless chicken breasts and decided to grill them and make a quick and simple Grilled Chicken Parmesan. I lightly sprayed the chicken breasts with olive oil and seasoned them with sea salt and black pepper. We grilled them for about 5 to 6 minutes on each side (they were not very thick). I placed them in a shallow casserole dish on top of a thin layer of Mezzetta tomato basil sauce (made with all natural fresh ingredients...no junk). I topped the chicken with fresh basil from my patio garden, then a layer of fresh mozzarella, tomato sauce and ended with a layer of shredded Parmigiano Reggiano. I thought about placing my casserole dish on the grill and using it as an oven and cook the entire meal on the grill...but decided instead to just pop it into the oven under the broiler for about 5 to 7 minutes until it was hot and bubbly and the cheese melted. I served it on top of yellow summer squash "pasta" that I made with my spiral vegetable slicer by Paderno. I actually have one I purchased from Amazon as well as one my son bought me at Williams Sonoma (also made by Paderno). When I just make veggie pasta for myself, I typically either use my Spirelli or my Kuhn Rikon julienne vegetable peeler. If you are making pasta for 2 or more people, it is sometimes quicker to use the spiral vegetable slicer. This dish would be good without the "pasta", too. I snapped a few photos for you to see below. The meal was ready in less than 30 minutes from start to sitting down eating -- perfect for a weeknight meal. Enjoy!


Tuesday, May 27, 2014

Cheeseburgers in Paradise...on Grain-free Sesame Seed Buns

This evening's dinner was quick and simple. We grilled cheeseburgers and had leftover Yellow Cheddar Squash Casserole from last night as our side dish. The cheeseburgers were extra cheesy because I mixed shredded cheddar cheese into the burgers (along with some Spicy Montreal Steak Seasoning) and then after they were grilled, I put sliced "Five Counties" cheddar cheese on top of them to melt. Five Counties cheddar is a blend of five different types of cheddar and it makes beautiful sliced cheese. I've found it at either Costco or Sam's Club. Of course...the only way to eat these "Cheeseburgers in Paradise" was on one of my grain free Sesame Seed Buns! I made a batch of them yesterday to have handy for the week. It was a quick and delicious meal. If you haven't tried my Sesame Seed Buns...I think you'll be pleased. They are super simple to make and don't require any kitchen appliances or whipping egg whites....just measure, mix, scoop and bake! I snapped a few photos below as well as included the recipe for my Sesame Seed Buns in case you haven't seen it yet. Enjoy!


Dough is scooped and smoothed -- ready for the oven
Before baking -- this is how puffed up they look
Close-up of the dough before baking
Fresh out of the oven
Side view after baking
Cooling on a rack

Sesame Seed Sandwich Buns

Ingredients:

3 tablespoons coconut flour, sifted

3/4 cup blanched almond flour
3/4 cup golden ground flaxseed
2 teaspoons baking powder
1 teaspoon baking soda
3/4 teaspoon sea salt, or to taste
3 tablespoons granular Swerve Sweetener
3 large eggs
1/2 cup buttermilk
3 tablespoons olive oil 
1 to 2 tablespoons sesame seeds

Directions:


Preheat oven to 350 degrees F.  


In a medium sized bowl, mix first 7 ingredients together with a whisk to help break up any lumps.


In a small bowl, beat eggs, buttermilk and olive oil together. Mix wet ingredients into dry ingredients until combined and a dough is formed. Dough will be thick and slightly sticky. 


Lightly spray a nonstick muffin top pan with olive oil or coconut oil spray. Using a 4-tablespoon size retractable scoop, divide dough into the 6 muffin top cavities. Using slightly moistened finger tips, gently pat down to form patty-sized dough circles that fill the muffin cup. Top with sesame seeds. Let sit for 5 to 10 minutes for dough to rise slightly. Bake for 20-22 minutes or until light golden brown and done. Cool completely before slicing with a sharp serrated knife.


Monday, May 26, 2014

Grilled Shish Kebab & Yellow Cheddar Squash Casserole - Memorial Day Cookout!

Happy Memorial Day! Today was a busy day. I had planned to make Shish Kebab (both chicken and beef) with grilled red, yellow and green bell peppers and onions. My marinade was a simple combination of lemon juice, olive oil, salt, pepper, minced garlic and fresh rosemary. For hubby and my sons, I made rice to go with their kebabs. I also made my Yellow Cheddar Squash Casserole. When I made it today, I made one little tweak to my recipe that made it even better. I always cook my squash in a little butter without any water and make sure to saute it until all the juices have evaporated so the casserole isn't soggy. I decided to make a little tweak to ensure it stays super rich and "non-liquidy" for everyone, just in case they don't cook off all the liquid as thoroughly as I do. It was a simple tweak and added even more flavor to the casserole. I added 1/4 cup finely grated Parmesan to the "sauce mixture"...and there was no moisture whatsoever in the casserole...it was rich, thick and delicious. In addition to the kebabs and squash casserole, I also grilled some Applegate nitrite/nitrate free hot dogs for the guys. I also had ground sirloin to make burgers with...but decided that it was just too much food, so I skipped the burgers. Our cookout almost got rained out because around 3:30, the sky opened up and we had monsoon rain, thunder, lightning and unbelievable gusting wind...a full fledged thunderstorm. It stormed for an hour or two but managed to clear up and the sun popped back out in time for us to grill. I'm not sure what we would have done if the rain didn't stop. I snapped a few photos of our dinner for you to see below. If you haven't tried my squash casserole yet...this is a perfect time to try it with yellow squash coming into season. I like this much better than macaroni and cheese! I've copied the recipe below and added my little Parmesan tweak. Enjoy!


Ready to be grilled...
Grilling
Hot off the grill...
Ready to pop into the oven
Fresh out of the oven...in its golden brown cheesy glory