Pages

Friday, February 28, 2014

Friday's Random Post & Guess My Snack AND...Guess Who's 80?

This past weekend I made a quick and easy mid-day snack for hubby and I since we don't typically eat lunch on the weekends. Instead, we eat a later and more substantial breakfast and a little snack mid-afternoon before our dinner. I'm going to post a couple pictures of my snack from last weekend...and see if you can guess what it is. One of the 2 items is going to be obvious...but see if you can guess what's on the "top".  I'm going to post the photos now at 7:00 pm...and later this evening I'll come back and post what it actually is/was. I'm just curious to see what you think it is because when I looked at the photos, I almost fooled myself! ;-)  Enjoy!

P.S. -- On a totally different side note, I recently (and unfortunately) had to have blood work done unexpectedly without fasting beforehand. I received the lab reports in the mail today and the one number that jumped out to me was my triglyceride level. My non-fasting triglycerides were 80 (normal is considered 150 or less). In case you don't read my blog regularly, I have a chronic problem with very high triglycerides (or had a problem with triglycerides she says with a smile) and that was while following all the mainstream advice to lower them (switching to "healthy" whole grains, exercise, eliminating the "white stuff", weight loss, etc.). When I began my wheat and grain free journey (with no added sugar)...my triglycerides were 546. The year before that they were 656. I could never have imagined it possible for MY triglycerides to ever be that low...not in a million trillion years with my history. The removal of all wheat, grains and most sugars is what I attribute that record breaking drop in my triglycerides to...well, that and Dr. Davis. I have to once again thank Dr. William Davis (author of Wheat Belly) for helping me see the light. I didn't believe it would work for me...I honestly and truthfully did not think it was possible to see a triglyceride level of 80 for me...not in my lifetime! So, if you are just embarking on your wheat/grain free journey...hang on because you are in for the journey of your life. Life is good and I am so thankful! 

MY NON-FASTING TRIGLYCERIDES ARE 80 !!!  :-)


So many of you guessed it...I'm surprised! I don't know why I saw "french fries/potatoes" when I looked at them? Back in my former starchy days, I made home made fries that looked EXACTLY like those (before they were fried). Somehow I just "knew" you'd see potatoes, too! Maybe I have gone from being a Wheat Belly to a "Mrs. Potato Head"!  :-)

It's Jarlsberg cheese (a "Swiss-like" cheese with a slightly nutty flavor, especially when at room temperature) -- more info here: Jarlsberg

Thursday, February 27, 2014

Chocolate Chip Cookies w/ a "Sugar Cookie Twist"!

This evening we had leftover Spicy Beef & Cabbage Soup for dinner. It was another chilly day here today, starting off with temps in the low 20s and not getting above the 40s. It was a nice evening to have soup for dinner. This past weekend I made a batch of my Chocolate Chip Cookies w/ Walnuts but only baked half of the dough (and made 1 dozen medium sized cookies with). I covered and refrigerated the remaining half of dough to bake later on in the week...and that "later" was this evening! Using the remaining half of dough, I made 15 small cookies. I wanted to play around and experiment a little with something I had been pondering.

I wondered how they would turn out if I sort of made a cross between chocolate chip cookies and sugar cookies. Since the dough had been refrigerated for days, it was nice and stiff and easy to roll up into nice neat little "cookie balls". I rolled them by hand into 15 small balls. I then rolled each little cookie dough ball around in a small bowl containing about 2 tablespoons of granular Swerve Sweetener until they were evenly coated. I placed them on a foil lined cookie sheet and used a small fork to lightly press the tops with a crisscross pattern (similar to making peanut butter cookies). I dipped the fork into the granular sweeetener after crisscrossing each cookie. I popped them into a 350 degree F oven and baked them for 15-18 minutes (mine took 18 minutes). I taste-tested them warm, almost cooled, and then again after they were completely cooled. They tasted good at each stage...however, just like I had hoped would happen...when the cookies cooled completely, the Swerve coating that appeared to just melt into the cookies as they baked, actually crisped up as the cookies cooled. Not like a crunchy/gritty kind of crisp...but more like a very thin delicate crisp sugar coating; a glaze of sorts. I really liked the consistency and it didn't make the cookies overly sweet either.

Chilling the dough ahead of time made the cookies easier to work with and roll into balls. I will definitely make them this way again and liked baking half of the dough one day and saving the rest to bake later on. It was nice making the dough to use more than once and then enjoying the convenience of just whipping it out of the fridge on a weeknight or whenever you want to make a quick batch of homemade cookies and enjoy them warm from the oven. I snapped a few photos below. To make them the way I did here, simply chill the dough and roll it up into small cookie dough balls and then roll in granular sweetener, press lightly with a fork and bake, per the recipe. Cool completely to lightly crisp the exterior of the cookies. The link to the recipe for the basic chocolate chip cookies is here: ---->  Chocolate Chip Cookies w/ Walnuts. Enjoy!


Is it a chocolate chip cookie or a sugar cookie?

Crisscross pressed with a "Swerve-dipped" fork
Fresh out of the oven


Wednesday, February 26, 2014

Spicy Beef & Cabbage Soup -- Slow Cooker Style

This morning it was dark, chilly and raining out. I had thawed some diced beef cubes to make my Spicy Beef & Cabbage Soup in my crock pot for dinner tonight, but when I woke up this morning, I wasn't particularly in the mood to prepare it before going to work. I convinced myself that I would be rewarded when I came home from work for the little bit of inconvenience this morning...so I pushed myself to make it. It only took me about 15 minutes to put it together and when I got home this evening I was so glad I went ahead and got it into the crock pot this morning. It smelled so good in the house when I got home from work this evening. While the sun finally made it out today, it remained chilly outside...and it was perfect soup weather. I usually use a 14.5 ounce can of diced fire roasted tomatoes in this soup, but couldn't find them quickly in my pantry this morning so I grabbed a 28-ounce can of crushed tomatoes and figured it would just have a bit more "tomatoey" soup base. Well, I really liked the additional tomato consistency in the soup broth; it made it richer tasting. Either way you make it, it tastes good. I love the combination of flavors in this soup and it is so very easy to make and requires very few ingredients. I find the chipotle chile powder in my local grocery store and it adds a nice flavor to the soup. If you don't have it, you can substitute cayenne pepper or ancho chile powder, too. I served the soup with leftover Easy Cheddar Black Pepper Biscuits that I toasted lightly in the oven. I snapped a few photos for you to see below. Enjoy!


Tuesday, February 25, 2014

Cheddar Biscuit Sliders -- Fast Food the Grain-free Way!

Tonight I made Cheddar Biscuit Sliders for dinner. What are Cheddar Biscuit Sliders you ask??? Well, it's fast food...the grain-free, REAL food way. Simply put, they are mini burgers sandwiched inside my Easy Cheddar Black Pepper Biscuits!  I had a little over a pound of ground sirloin in the fridge. I placed the beef in a bowl and added a couple tablespoons of finely diced onion and a few generous shakes of Montreal Spicy Steak Seasoning (you can buy it in your local grocery store) and mixed everything together well. I left the onion out of hubby's burgers since he doesn't care for it. I formed the ground sirloin into small patties the size of my biscuits and cooked them in a large skillet with a little bit of oil until they were medium-well. Since they are small, they cook quickly. I had a plate of Easy Cheddar Black Pepper Biscuits leftover that I made this past weekend for breakfast. Using a sharp serrated knife, I sliced them in half and placed them open-faced in a baking pan in a 300 degree oven to warm and lightly toast while the burgers cooked. While the burgers cooked and the biscuits warmed, I opened a package of fresh haricots verts (long thin French green beans) and placed them in a covered Pyrex casserole dish with 1 tablespoon of water and microwaved them on high for 2 minutes; then added a bit of diced fresh red bell pepper and microwaved another 2 minutes more. I drained the tiny bit of water in the bottom of the dish and added some Kerrygold Garlic & Herb Butter and a dash of Celtic sea salt...and in less than 5 minutes I had a beautiful, fresh side dish that is SO much better than boring french fries to serve alongside my burgers. So, tonight we had "fast food" for dinner. Fast food has understandably gotten a bad rap recently...but there is absolutely nothing wrong with eating fast food...as long as you are eating fast REAL food. Tonight I did just that! Before removing the sliders from the skillet, I placed some sliced white cheddar cheese with chipotle peppers (similar to pepper-jack cheese) on top of each to melt and then placed them on top of the biscuit bottoms, added a little squeeze of ketchup (with no HFCS) and then added the little biscuit lids...and "Voila"...Cheddar Biscuit Sliders. I loved utilizing the leftover biscuits as little slider buns...and I must say that they were so much better than any slider bun I had ever had before! I snapped a few photos below. If you'd like to see the recipe for my biscuits that I made this past weekend (and used here as slider buns)...the recipe is here: -----> Easy Cheddar Black Pepper Biscuits. Enjoy!


Monday, February 24, 2014

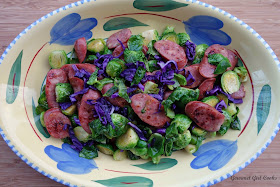
Stir-Fried Sprouts, Red Cabbage & Chicken-Apple Smoked Sausage -- Quick, Simple & Delicious

This evening I made a super quick and delicious dinner. It took me less than 30 minutes and had only 5 ingredients. As many of you that follow me probably already know...I really like brussels sprouts. No, I really LOVE brussels sprouts. There is just something about them when they are cooked just long enough not to be crunchy but not cooked so much they become soft and mushy. I like to preserve their texture and their beautiful bright green color...no drab in the lab green sprouts for me! This evening I paired them with Aidells Chicken & Apple Smoked Chicken Sausages that I sliced diagonally (to give more surface area for browning) into 1/4 inch slices. Because of the diced apples in them, they brown and caramelize nicely. The combination of the smoked sausage flavor, the natural sweetness of apples combined with the baby "cabbaginess" of the sprouts, tossed in Kerrygold butter...well, it's like a match made in heaven. I just happened to have about 1 cup of thinly sliced red cabbage left from salads I made to go with last night's dinner...so I thought, why not lightly steam that for a minute and toss that into this match made in heaven dish I was making. It was an awesome addition and not only added a little more texture and crunch...but the most beautiful color you could ever imagine. The only thing you might want to add other than the 4 main ingredients of sausage, sprouts, red cabbage and butter is maybe a touch of salt and pepper...but you really don't need that because the sausages add so much flavor. I buy my Aidells sausages at Costco, but most of my local grocery stores sell them, too. It is really good quality sausages made with natural ingredients (gluten free, no nitrates, etc.). I snapped a few photos below of this super simple, super gorgeous meal as well as the easy peasy recipe. If you can't find these sausages, you can substitute your favorite kind or type of sausage...but if you are able to find these, they are worth trying. Enjoy!


Sunday, February 23, 2014

Chocolate Chip Cookies w/ Walnuts -- My Favorite Grain-free Chocolate Chip Cookies!

Today was a busy day. We had a number of errands and things to do this afternoon and while out on the other side of town, we stopped on our way home at a different Costco. While most area Costco's seem to carry most of the same items, every one I have been to also carries some different things the others don't. For instance, this Costco we went to had lots of different cuts of veal that my regular Costco doesn't carry. They probably had 5 different cuts. They also had other items and more higher end items as well (like Le Creuset, All Clad, very high end jewelry, etc.). I am trying not to overdo it so I didn't go up and down every single aisle like I usually do...but we covered the majority of the store. This Costco also has a separate liquor store with its own entrance. The main store still carries beer and wine but it also sells hard liquor at this one, too, via a separate store/entrance. Since I didn't get back home until after 5:00, and both boys told me they were eating with us, I just stopped at the store and picked up some boneless chicken breasts and diced and sauteed them in a little olive oil when I got home along with diced red bell pepper and quartered fresh mushrooms. I used Del Grosso's "Sunday Marinara" sauce and spiced it up a bit with red pepper flakes and cayenne. I simmered the chicken and veggies in the sauce uncovered for about 30-40 minutes to thicken and meld the flavors together. Simmering chicken in tomato sauce makes the chicken very tender (I assume because of the acidity in the tomatoes). I served it to hubby and both sons while I ate the leftover "String Cheese Chicken Roulade" to finish it up. I also made fresh green salads to go with our meal. I still have half of my leftover pizza from last night to eat for lunch tomorrow (Yay!). Late yesterday afternoon I made my Chocolate Chip Cookies w/ Walnuts. I baked a dozen of them last night and then refrigerated the remaining half of the dough to bake later this week. I added extra walnuts to this batch of cookies (I used 1 cup of walnuts instead of 1/2 cup) to give them some extra nutty crunchiness. They turned out really good and look slightly lumpier because of the extra nuts. I snapped a few photos below and included the recipe below, too. The batch of cookies in these photos have the extra nuts. I just scooped and dropped them onto my cookie sheet using a retractable cookie scoop so they are more "natural looking". If you want to see how they turn out with the normal 1/2 cup of walnuts as well as when they are gently rolled into balls that produce a "neater looking" cookie...click here: Chocolate Chip Cookies. Enjoy!


Saturday, February 22, 2014

Saturday Night Pizza -- Grain-free Greatness

Today was a beautiful day here. I forced myself to stay home today and "rest". I did do some cooking to help pass the time. I'm having Costco withdrawals, so I may have to venture out there tomorrow if I'm up to it. I actually felt pretty good this afternoon and evening. Since I didn't do any shopping today, I decided to make pizza for dinner since I always have the ingredients for that. I also made a double batch of pizza crust this time so I could make an extra crust to bake and use as a "convenience food" at a later time. I baked it and wrapped it well after it cooled. I plan to either refrigerate it or freeze it tomorrow, depending on whether I intend to use it this coming week. I kept this evening's pizza pretty simple. I had all kinds of toppings that I could have used for it, but added simply freshly shredded mozzarella cheese, oven roasted tomatoes, Boars Head pepperoni and then topped it with sliced green onion tops after pulling it out of the oven. It turned out really good. Since it was such a pretty afternoon and evening, I snapped a number of different photos of the various stages of my pizza making so I could have an excuse to step outside on our patio. I included the pizza crust recipe below. If you'd like to see another post where I did step by step photos, click here: Pizza. Enjoy!

Voila!
Pizza dough is spread and ready to be baked
Baked and fresh out of the oven
Topped with freshly shredded mozzarella cheese (I did not use sauce)
Topped with oven roasted tomatoes (packed in oil) instead of using pizza sauce
Topped with Boars Head pepperoni and ready to pop into the oven
Fresh out of the oven and sprinkled with sliced green onion tops
Now THIS is pizza...
BOOM!
People always wonder if you can pick my pizza up to eat it...YES, here it is leaning against a glass -- can you do that with other grain-free pizza crusts?

Almond-Flax-Parmesan Herb Pizza Crust
Makes 1 10-inch round pizza (approximately 2 servings)

Dry Ingredients:
1/4 cup  almond flour
1/4 cup  golden flax seed meal (organic golden flax is milder in taste than brown)
2/3 teaspoon baking powder (aluminum free)
1/2 - 1 teaspoon dried Italian seasoning
1/4 teaspoon garlic powder
1/4 teaspoon onion powder 
Dash cayenne pepper, optional
1/4 teaspoon sea salt, or to taste (decrease salt if using saltier cheeses and toppings)
Few grinds of freshly ground black pepper
4 - 5 tablespoons Parmesan cheese, finely grated

Wet Ingredients:
1 egg (or 1/4 cup egg substitute such as Egg Beaters)
1 tablespoon olive oil (a little more, if desired)
1 to 2 tablespoons water (start with 1 tablespoon of water and add the second, if necessary)

Toppings (Optional):  
Pizza sauce, pesto sauce, etc.
Cheese: shredded mozzarella cheese, sliced or diced fresh mozzarella, etc.
**Pre-cooked vegetables of choice: onions, green peppers, mushrooms, spinach, etc. 
**Pre-cooked meat of choice: sausage, ground beef topping, etc.
Other: artichokes, olives, pepperoni, etc.

**Tip: Fresh vegetable and meat toppings should be pre-cooked and drained to prevent crust from becoming soggy

Directions:
Preheat oven to 375 degrees.  Mix dry ingredients together; add wet ingredients and mix well. Let the dough sit for approximately 5 minutes to thicken. 

Spread dough on a lightly oiled large pizza pan or cookie sheet lined with greased parchment paper (you can also use Reynolds non-stick foil, lightly brushed with olive oil).  Using a lightly oiled rubber spatula, press the dough out to desired shape and thickness (I usually make it about 1/4" thick -- *see note below).  Bake for 15-20 minutes or until cooked through (check crust after 15 minutes and remove from oven when it looks and feels done).  Spread with a thin layer of sauce, cheese and desired toppings (fresh vegetable and meat toppings should be pre-cooked to prevent soggy crust); place back into the oven to bake an additional 5-10 minutes to melt cheese.  If desired, run under the broiler for a few minutes to lightly brown the toppings and make the cheese bubbly (be careful not to burn it).

*Note:  For a crust that is flat, smooth and even in thickness, lightly spray a 2nd sheet of parchment paper with olive oil spray and place it on top (oiled side down) of the ball of pizza dough that is centered in the middle of your prepared pizza pan or baking sheet.  Using either your hands or the flat edge of an object (I use a big container of black pepper) press the dough smooth by swiping it the direction you want the pizza crust to go.  When it is the desired thickness and shape, carefully peel off the top layer of parchment paper...and "Voila"...perfectly flat, smooth, thin pizza crust! If you don't have parchment paper, pressing the dough out with a lightly oiled rubber spatula works just fine, too.


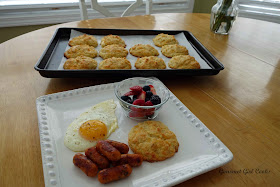
Saturday Brunch -- Farm Fresh Eggs, Sausage and Cheddar Black Pepper Biscuits

Happy Saturday! This morning we slept in late. While hubby ran our little dog, Spike, to the groomer to get beautified mid-morning, I whipped up a batch of my Easy Cheddar Black Pepper Biscuits. I wanted to have them alongside the "farm fresh" eggs I was gifted with this past week. If you haven't seen the beautiful eggs I received...click here to take a peek: ---> Farm Fresh Eggs. I browned some little "Three Cheese Mini Chicken Sausage" links by Old World Kitchens (I've found them at both Costco and Sam's Club) and then fried some of the beautiful eggs in Kerrygold butter. I had one egg for breakfast and hubby had two. Eating the eggs fixed this way allowed us to enjoy and appreciate their fresh taste more than we could in the omelet I made for dinner earlier in the week using them. The omelet had so many things in and on top of it that you couldn't appreciate the taste of the eggs alone. We enjoyed the biscuits, eggs and sausage along with some mixed fresh berries my son brought me earlier in the week (strawberries, blueberries, raspberries and blackberries). We ate our "brunch" around lunch time and it will last us until dinner time. I snapped a few photos of my breakfast and biscuits. I've also copied the biscuit recipe below, too. Enjoy!


This is what the biscuit dough looks like when it's ready to scoop onto your baking sheet
Biscuit dough balls are ready to be baked
Voila...fresh out of the oven
Here's another shot of the biscuit dough balls before baking
Baked and ready to enjoy!

Easy Cheddar Black Pepper Biscuits

Ingredients:
2 cups blanched almond flour
3 tablespoons "cold" butter, diced
1 egg (or 1/4 cup Egg Beaters)
1 cup sharp shredded cheddar cheese, divided
1/4 to 1/2 teaspoon salt, or to taste
1/2 - 1 teaspoon freshly ground black pepper, or to taste
2 teaspoons baking powder (aluminum free)
1/2 cup heavy cream 

Directions:
Preheat oven to 350 degrees F.  Lightly grease a baking pan or line with non-stick foil or parchment paper.  

In a medium bowl, add almond flour, butter, egg, 1/2 cup of cheddar cheese, salt, black pepper, baking powdercut in with a pastry cutter/dough blender until crumbly and all flour is slightly moistened and cheese is pulverized into the mixture. Stir in cream and remaining 1/2 cup of shredded cheddar cheese; mix in lightly.  Divide and roll dough into 10 to 12  balls (I make 10) and place on a lined cookie sheet; do not flatten dough balls (this will result in a thicker biscuit).  Bake at 350 degrees F for approximately 18-20 minutes or until light golden brown; be careful not to overcook.   Remove from oven; brush tops with melted butter, if desired.


Friday, February 21, 2014

String Cheese Chicken Roulade -- Simple "Grain-free Gourmet"

This evening I made String Cheese Chicken Roulade for dinner and served it alongside a fresh green salad. I had a package of chicken cutlets in the fridge along with some large fresh basil leaves. While rummaging around in the fridge, I spotted part of a package of fresh mozzarella and some string cheese...so that's how my inspiration for dinner came together this evening. It was fairly simple to put together and it turned out really good. A roulade is simply a piece of meat rolled around cheese or veggies or a combination of both. It sounds a lot fancier that it really is and looks pretty when sliced. I snapped a few photos of my meal below as well as the super simple recipe. You can substitute whatever cheese you prefer inside and if you don't have basil, a little cooked spinach or spear of steamed broccoli, asparagus or whatever you like can be rolled up into your roulades. Enjoy!


Rolled up and ready to bake
Topped with diced mozzarella and shredded Parmesan; ready to go back into the oven
Fresh out of the oven...all the cheeses have been melted
Fresh basil has been scattered and ready to be served

This is one of the "good sauces"...all natural and no added sugar
These are the kind of ingredients that go into a "good sauce"