Sunday, June 30, 2013

Pot Roast, Rich & Thick Parmesan Cauliflower Mash and Roasted Brussels Sprouts

This evening we had pot roast, Rich & Thick Parmesan Cauliflower Mash (topped with a pat of Kerrygold butter), roasted brussels sprouts and boiled buttered carrots for dinner.  I put the pot roast into my crock pot when I got up this morning.  I didn't do anything fancy; I placed a boneless shoulder roast into the crock pot, sprinkled ground chipotle chile powder on top, dumped a can of diced tomatoes over it and then added in some diced Vidalia onion and red bell pepper. I sprinkled some fresh chopped parsley on top and closed the lid and let it cook about 8 to 9 hours on low. All I had to do for dinner preparation this evening is prepare the veggies.  It turned out good...and as always, the meat was really tender (I love crock pots).  I snapped a few photos below as well as included my recipe for Rich and Thick Parmesan Cauliflower Mash, too.  Enjoy!


There's a pot roast hiding under there...this is right before putting the lid on to cook all day!

Rich and Thick Parmesan Cauliflower Mash

INGREDIENTS:


1 medium head of fresh cauliflower, broken into 1-inch florets
1 cup (8 oz) of chicken broth or stock
2 ounces brick style cream cheese (1/4 of an 8-oz brick)
3 to 4 tablespoons heavy cream
3 to 4 tablespoons grated Parmesan cheese
Sea salt, to taste
Freshly ground black pepper, to taste

DIRECTIONS:

In a medium saucepan, place cauliflower and chicken broth; bring to a boil and then cover pan; turn heat down to low and simmer until cauliflower is very soft and tender and chicken broth has completely cooked into the cauliflower (about 20 to 30 minutes). Make sure there is no liquid left at all in the bottom of the pan (remove the cover if necessary and cook until any remaining liquid is gone and the cauliflower is no longer wet looking).  Remove pan from heat and add cream cheese and heavy cream.  Using an immersion blender stick, blend or puree the cauliflower until the cheese and cream are fully incorporated and the mixture is smooth.  Add grated Parmesan cheese and salt and pepper, to taste.  Blend another minute.  Adjust seasoning and add additional cream, if necessary, to thin out a little bit.  The cauliflower mash should be thick and not runny at all. 

*Note:  To reduce the cooking time for the cauliflower, just cut it up into smaller pieces. If you don't have an immersion blender, you can use a handheld potato masher, it just won't be quite as smooth.

Sunday Brunch...Eggs, Bacon & Easy Cheddar Black Pepper Biscuits

This morning we slept in again (yay)!  When I got up, I put a pot roast into the crock pot for later today and then we got ready to go out and do our walk before the heat got too unbearable.  During our walk, we go past a grocery store, so on our way back we popped in and picked up a few things (like uncured bacon) to make for our late breakfast/brunch.  I cooked the bacon in the oven on a baking sheet (in a single layer) at 400 degrees for about 12-13 minutes.  While that was cooking, I made an easier version of my Cheddar Black Pepper Biscuits.  When I baked them, I didn't press them down at all -- I kept them in dough balls to see if that would help keep them a bit thicker...and it worked like a charm!  They turned out absolutely beautiful -- some of the best wheat/grain free biscuits I've made!  After I pulled the bacon out of the oven, I turned the temperature down to 350 degrees F and popped the biscuits in and baked them for about 18-20 minutes. While the biscuits were baking, I fried some organic eggs in Kerrygold butter.  I also mixed some plain Fage Greek yogurt with a bit of vanilla and freshly grated lemon zest and topped it with blueberries and a strawberry.  We enjoyed breakfast with a cup of hazelnut coffee. It was a delicious breakfast/brunch that will last us until dinner time.  I snapped a few photos below as well as the recipe for my Easy Cheddar Black Pepper Biscuits.  Enjoy!


Easy Cheddar Black Pepper Biscuits

INGREDIENTS:


2 cups blanched almond flour

3 tablespoons "cold" butter, diced
1 egg (or 1/4 cup Egg Beaters)
1 cup sharp shredded cheddar cheese, divided
1/4 to 1/2 teaspoon salt, or to taste
1/2 - 1 teaspoon freshly ground black pepper, or to taste
2 teaspoons baking powder (aluminum free)
1/2 cup heavy cream 

DIRECTIONS:


Preheat oven to 350 degrees F.  Lightly grease a baking pan or line with non-stick foil or parchment paper.  

In a medium bowl, add almond flour, butter, egg, 1/2 cup of cheddar cheese, salt, black pepper, baking powdercut in with a pastry cutter/dough blender until crumbly and all flour is slightly moistened and cheese is pulverized into the mixture. Stir in cream and remaining 1/2 cup of shredded cheddar cheese; mix in lightly.  Divide and roll dough into 10 to 12  balls (I make 10) and place on a lined cookie sheet; do not flatten dough balls (this will result in a thicker biscuit).  Bake at 350 degrees F for approximately 18-20 minutes or until light golden brown; be careful not to overcook.
  Remove from oven; brush tops with melted butter, if desired.


Saturday, June 29, 2013

"Pasta" w/ Italian Sausage & Peppers

Today was a hot and muggy day here and while it was sunny for a good part of the day, we had scattered showers on and off which kept the humidity level high...yuck!  I was able to sleep in a little late this morning which is a nice change.  Hubby and I decided to take our walk before eating this morning.  We took a long walk -- about 5 miles, and then came back and had breakfast.  I had every intention of making an omelette for breakfast, but with the high humidity, I felt overheated and a bit nauseous...so I just had some Greek yogurt with a little natural banana extract, chopped walnuts and then stirred in some fresh blueberries.  It was after noon time when we ate our breakfast, so we didn't eat again until dinner.

I was in the mood for Italian Sausage & Peppers this evening.  I picked up some fresh Italian turkey sausage links and browned them lightly on both sides, then added some water, covered them, and turned the heat to low and simmered for about 15 minutes or so.  For my pasta, I used lightly sauteed julienned yellow squash (hubby had regular pasta with his).  I used my favorite Mezzetta sun-dried tomato pesto (you only need a heaping tablespoon or two since it is so intense and flavorful).  I like to mix it with some additional extra virgin olive oil and then toss it with the sauteed yellow squash pasta.  While the sausage links were cooking, I sauteed red and orange sliced mini peppers, Vidalia onion, and sliced mushrooms in a skillet and then transferred them to a plate.  After the sausage was done cooking, I sliced it diagonally and placed them in a lightly oiled skillet and lightly browned the slices on both sides.  I diced a little fresh mozzarella, sliced some Campari tomatoes and then tossed it all together with the "pasta", veggies, sausage, and pinch of red pepper flakes for a little heat.  I topped it with some shredded Parmigiano Reggiano and minced Italian parsley when I served it.  We enjoyed it with a few small slices of my Easy Cheesy Herbed Parmesan Bread that was left from the other night.  It was an absolutely delicious meal.  I can honestly say that I enjoyed this Italian Sausage & Peppers dish more than any other version of it I have ever made.  It was simple and flavorful.  I snapped a few photos below for you to see. Enjoy!


My favorite brand of pesto!


Friday, June 28, 2013

Quick & Easy Dinner For One...

This evening, hubby met a couple of friends for dinner...so it was just me to make dinner for this evening.  I decided to keep it simple since I wasn't hungry for anything in particular.  I made myself a medium sized salad with chunks of chicken breast and had some of the leftover Easy Cheesy Herbed Baguette Bread that I made last night. Of course, I had to have a little piece of Key Lime Pie for dessert, too, so I could celebrate the fact that it was Friday night!  Hubby picked up a movie on his way home...so we are going to watch "The Call" with Halle Berry this evening.  I snapped a quick photo of my quick and easy "dinner for one".  Enjoy!

BOOM!
  

Thursday, June 27, 2013

"That's Italian" - Thursday Night's Italian Feast (Cheesy Baguette Bread Recipe)

This evening I was in the mood for an Italian style dinner.  I decided to make "pasta", Easy Cheesy Herbed Baguette Bread (improved recipe) and a small side salad.  I started my dinner prep by making the baguette bread first.  While it was baking, I made a quick and simple "pasta" using yellow summer squash that I cut with my julienne peeler.  I have found that yellow summer squash pasta does not release the amount of liquid when cooked like zucchini pasta does.  I didn't want to make a regular red pasta sauce, so instead, I used a heaping tablespoon of Mezzetta's sun-dried tomato pesto and mixed it with extra virgin olive oil to serve as a scant, but flavorful "sauce". To cook the pasta, I lightly sauteed it in a bit of olive oil until al dente and then stirred in the sun-dried tomato pesto and olive oil and tossed it to coat well.  In a separate skillet I sauteed diced Vidalia onion, red bell pepper and a large minced clove of garlic until almost tender and then added 1 pound of ground sirloin, breaking it up as it browned.  I seasoned it well with Celtic sea salt, lots of freshly ground black pepper and a generous pinch of red pepper flakes.  Once it was nice and browned, I removed it from the heat and stirred in a couple tablespoons of extra virgin olive oil.  I tossed the "pesto coated pasta" with the browned meat mixture and added in some sliced fresh mini San Marzano tomatoes to keep them fresh and just slightly heated.  I sliced the baguette bread and added a side salad and we had a delicious "Italian Style Feast". I snapped a few photos below and included the recipe for my improved Easy Cheesy Herbed Baguette Bread.  Enjoy!


Yellow squash pasta before cooking

Baguette bread dough spread and "ready to roll"

Before going into the oven to bake

BOOM!

Easy Cheesy Herbed Baguette Bread (Improved)

INGREDIENTS:

Dry Ingredients
1/2 cup golden flax seed meal (organic golden flax has a milder taste than brown)
2/3 teaspoon baking powder (aluminum free)
3/4 teaspoon dried Italian seasoning
1/4 - 1/2 teaspoon sea salt, more or less to taste (*use less salt if using a saltier cheese filling)
Few grinds of freshly ground black pepper
6 tablespoons Parmesan cheese, finely grated

Wet Ingredients
1 egg (or 1/4 cup egg substitute such as Egg Beaters)
1 tablespoon olive oil (a little more, if desired)
2 tablespoons water
1 teaspoon apple cider vinegar

Cheesy Herb Filling
1/2 - 3/4 cup "favorite" shredded cheese (Italian blend, mozzarella, cheddar, Parmesan, etc.)
1/2 teaspoon dried Italian seasoning
Freshly ground black pepper, to taste
Pinch red pepper flakes, optional

DIRECTIONS:

Preheat oven to 375 degrees F.  Mix dry ingredients together; make a well in the center of the bowl and add wet ingredients; mix well until a dough forms.  Let the dough sit for about 5 minutes to thicken (if the dough is still too wet or sticky after sitting to handle, add a little additional flax meal or grated Parmesan to stiffen it up a bit). Spread dough on a lightly oiled pan or a cookie sheet with greased parchment paper or foil (I use Reynolds non-stick foil, lightly brushed with olive oil or parchment paper lightly sprayed with olive oil).  

Press the dough out with a rubber spatula (to keep it from sticking) into a rectangular shape (approximately 12" x 8").  Sprinkle shredded cheese of your choice evenly on top of the dough; sprinkle with seasoning, black pepper and red pepper flakes, if desired (do not put too much cheese or it will be difficult to roll and will weigh the bread down as it bakes). The easiest way to roll it up is to place it on parchment paper or foil (on the cookie sheet) and lift the long side and use it to roll it over and when you are almost done rolling at it is at the edge, slide a new piece of parchment paper underneath and continue rolling it off onto the new piece.  You could also use your hands or a rubber spatula and begin gently rolling the dough lengthwise, jelly roll fashion, until it is rolled into a tube shaped baguette.  Make sure the seam side is down and gently press the ends closed so cheese doesn't melt out while baking.  Lightly sprinkle top of baguette with additional shredded cheese, if desired.

Bake for approximately 20 minutes or until baguette looks and feels done.  Remove from oven and let cool about 5 minutes on a rack.  Slice, spread with butter...and enjoy!

Note:  This would also be good with some crumbled, cooked Italian sausage scattered on top of the cheese before rolling.  You can substitute the seasonings, cheeses, etc. for those that are your favorite.  The possibilities are endless!


Wednesday, June 26, 2013

Simple Tuna Salad Boats...

For some odd reason, this evening I wasn't in the mood to spend very much time making dinner (part of that might have been because I knew I had a yummy dessert, my Key Lime Pie, waiting for me afterwards)!  LOL  Last night we finished up the leftover spinach-feta pie and salmon for dinner. Tonight I just didn't have a taste for anything in particular. You know...one of the nights when you come home from work and just stand there in front of your fridge and/or pantry...staring at all the stuff packed in there...but seeing absolutely "nothing"???  Well, that was me tonight. Then, out of the corner of my eye, I caught a glimpse of a can of tuna just sitting there on the shelf looking rather lonely...and started thinking about how it had been a while since I'd made tuna salad (which I love).  I also had some beautiful little heads of artisan romaine lettuce in the fridge which would be perfect to cradle my tuna salad in!  So, I drained and flaked the tuna (I use Wild Planet); chopped some celery, Vidalia onion, red bell pepper, dill pickle and then mixed it together with some mayonnaise and a squeeze of fresh lemon juice.  I filled small romaine lettuce leaves with the tuna salad, added some roasted almonds to my plate, sliced tomato and some sliced mozzarella cheese...and "Boom"...dinner was served.  It took very little time to prepare; it didn't heat up my kitchen; and it was yummy!  What more could a gourmet girl want?  LOL  Dinner doesn't have to be time consuming and complicated to be delicious.  Sometimes I enjoy the most simple meals the best!  After dinner, I enjoyed a little piece of my Key Lime Pie for dessert along with coffee.  It was a perfect easy peasy summer dinner.  I snapped a few photos below.  Enjoy!

Voila!


BOOM!

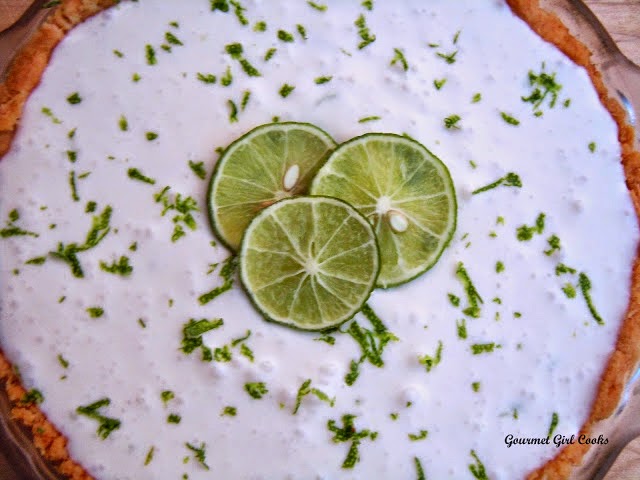
Key Lime Pie w/ Almond Coconut Crust (Made with GGC's Sweetened Condensed Coconut Milk)

In the last couple of weeks, I've had a couple of requests from followers to create a wheat/grain/sugar free version of Key Lime Pie.  I decided to make a version that did not require the filling to be baked (only the pie crust required baking).  The filling was put together and then poured into the pie crust and chilled for several hours, making it a nice cool summer dessert.  Many recipes for Key Lime Pie have separate layers (with the whipped cream layer being on top).  I decided to roll it all together into one layer and simply fold the whipped cream into the lime filling (thus creating a light mousse-like consistency).  To give it a bit more richness, I also added cream cheese to the filling.  I used my recipe for Sweetened Condensed Coconut Milk (made with Swerve) in place of what would traditionally be canned regular sweetened condensed milk which is loaded with carbs and sugar. Using unsweetened full fat coconut milk and Swerve (my sweetener of choice) rather than regular milk drastically reduces the carb and sugar content.  It is very simple to make, but requires about 45 minutes to reduce while simmering on the stove, so I always make a double batch to use for something else. My sweetened condensed milk recipe is actually a "double batch" that uses 2 cans of unsweetened coconut milk since it is nice to have the extra available to make something else with, without having to wait the 45 minutes to reduce.  The second dessert or treat that you make with the other half of the batch is SO much quicker to put together and make.

I have re-posted my recipe for the Sweetened Condensed Coconut Milk below and also linked it in the ingredient list to my recipe for Absolutely Magical Cookie Bars that I made back in March with my recipe; so, that's a suggestion of something you might want to make with the other half batch of sweetened condensed milk. Check those out when you get a chance...they turned out really good. The pie crust recipe makes one 9 or 10-inch pie crust.  It will also make two 6-inch pies (which I chose to make using my 6-inch Pyrex pie dishes).  I used my basic almond pie crust but reduced the almond flour a bit and replaced some of it with shredded unsweetened coconut to make an Almond Coconut Pie Crust and added a dash of Ceylon cinnamon as well. I made two different versions of the pie -- one had a "mousse-like" consistency and was light, sweet and tart...and tasted just like traditional key lime pies tastes. The other was a little more thick and rich because I increased the amount of cream cheese by an additional 4 ounces, which made the texture a bit more solid and firm. My personal preference was the lighter more mousse-like version (pictures below).  Also note in the photos below, that I used an entire 1-pound bag of Sunkist key limes in order to get the 1/2 cup of lime juice for this recipe. Since I wasn't sure if I would have enough juice, I bought an extra little bottle of key lime juice "just in case". The bag of limes literally gave me the exact amount I needed. Surprisingly, even though key limes are very tiny (walnut sized), they are very thin skinned and actually produce more juice than you would expect to come out of such a tiny little lime.  In case you are interested in reading a little bit about key limes and how they differ from regular Persian limes, here is a link to some info: Key Lime Info. I snapped a few photos below for you to see. Enjoy!


Here's a look at one of the pie crusts before being baked, the bag of key limes and the kind of coconut milk I used.
The Key Limes are on the left...for perspective, I placed a regular Persian lime on the right and the "just in case" juice is in the middle.
I ended up with 3 cups (instead of 2-1/2 cups) of Sweetened Condensed Coconut Milk (the pie only requires 1-1/4 cups).
Note that I used the entire pound of Key Limes to get 1/2 cup of juice.


Key Lime Pie w/ Almond Coconut Crust
Makes one 9" or 10" pie or two 6-inch pies

INGREDIENTS:


For the Almond Coconut Crust

1-1/2 cups blanched almond flour (use 2 cups if omitting the coconut listed below)
1/2 cup shredded unsweetened coconut (small fine shreds)
3 tablespoons cold butter, diced into small cubes
1 large egg
Dash Ceylon cinnamon, optional

For the Filling
1 8-ounce package cream cheese (brick style), softened (add additional 4 ounces for richer/thicker version)  *(see note below)
1-1/4 cups Sweetened Condensed Coconut Milk (recipe below)
1/2 cup key lime juice  *(see note below)
1 teaspoon lime zest  *(see note below)
1/2 cup cold heavy cream (can increase up to 3/4 cup, if desired)
3 to 4 tablespoons Swerve confectioners style sweetener
1/2 teaspoon vanilla extract
Additional sweetener (Swerve or stevia drops) to taste, optional
Additional whipped cream for serving, optional

DIRECTIONS:


To make the crust, preheat oven to 325 degrees F.  Place all crust ingredients in a medium bowl.  Cut butter and egg into flour with a pastry cutter until mixture resembles small pebbles and the flour is thoroughly moistened (the same way you prepare a regular pie crust).  Press crust mixture into pie dish or tart pan (I use either a 10" Pyrex pie dish or 2 smaller 6" Pyrex pie dishes).  Bake for approximately 25 minutes or until light golden brown; remove from oven and set aside to cool.


To make the filling, in a large mixing bowl, beat softened cream cheese until fluffy using a hand mixer.  Add sweetened condensed coconut milk and lime juice and beat until mixture is smooth; stir in lime zest.


In a separate medium bowl, whip heavy cream until cream begins to thicken; add vanilla and Swerve sweetener and continue whipping until stiff peaks form, about 3 minutes.


Using a rubber spatula, fold whipped cream into cream cheese mixture until well blended and smooth. Taste for sweetness and add additional sweetener, if desired. Pour mixture into baked, cooled crust(s).  Refrigerate for 3 to 4 hours or until set (overnight is even better). Serve with additional whipped cream, if desired.


*NotesAs a delicious (and easier to find) alternative, you can substitute lime juice and zest with lemon juice and zest instead to make a delicious "Light Lemon Cream Pie". If you prefer a richer/thicker filling, add an additional 4 ounces of cream cheese to the filling for a total of 12 ounces (1-1/2 bricks of cream cheese).  The 8 ounces will yield a fluffy and light "mousse-like" consistency and ideally should be refrigerated overnight.


The recipe for Sweetened Condensed Coconut Milk is below - note that the recipe can be halved (the Key Lime Pie only requires 1-1/4 cups of condensed milk) 


Sweetened Condensed Coconut Milk (makes 2-1/2 cups)
** Key Lime Pie uses 1-1/4 cups of Sweetened Condensed Coconut Milk (approximately half of this recipe)

INGREDIENTS:

2 (14-ounce) cans unsweetened coconut milk
2 tablespoons unsalted butter
1 teaspoon vanilla extract
Stevia drops, optional (if additional sweetness desired)

DIRECTIONS:

Add coconut milk to a small heavy saucepan and stir in Swerve or sweetener of choice, butter and vanilla.  Bring to a boil over medium-high heat.  After milk comes to a boil, reduce heat to low-medium and simmer, stirring and whisking frequently for about 45 minutes until reduced almost by half. Taste for sweetness.  If additional sweetness is desired, add liquid stevia drops (or sweetener of choice) until desired sweetness is achieved. Makes approximately 2-1/2 cups of sweetened condensed coconut milk.  Cool before using in recipes. Refrigerate any unused portion.

*Note:  Key Lime Pie uses 1-1/4 cups of Sweetened Condensed Coconut Milk (approximately half of this recipe)


Monday, June 24, 2013

Roasted Wild Sockeye Salmon w/ Lemon, Garlic & Herb Butter and Asparagus Roasted w/ Avocado Oil & Pomegranate Vinegar

This evening I fixed the wild Copper River Sockeye Salmon that I picked up at Costco this past weekend. It was a large fillet that I cut into 4 nice sized pieces. I kept it simple by roasting it in the oven after brushing it with Lemon, Garlic & Herb Butter (2 tablespoons of melted Kerrygold Garlic & Herb Butter mixed with 1 teaspoon fresh lemon zest and 2 tablespoon of lemon juice). I put it in a 450 degree F oven to roast for 5 minutes and then turned the heat down to 425 degrees and roasted it an additional 7 minutes. As soon as I remove it from the oven, I cover it with foil and let it sit for at least 10 minutes or so.

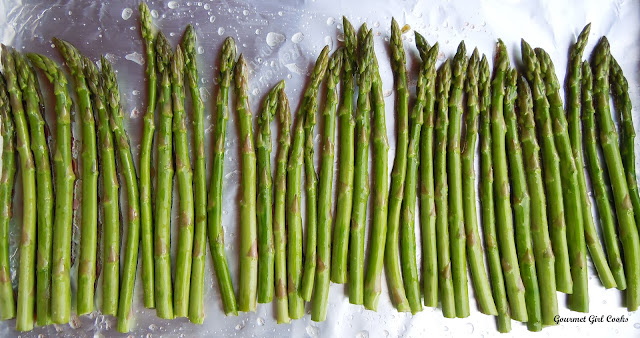
Meanwhile, while my salmon was roasting, I prepared another baking pan to roast fresh asparagus as soon as the salmon came out of the oven.  I placed the asparagus in a single layer on the pan and then drizzled it with avocado oil and seasoned with Celtic sea salt and freshly ground black pepper. Before tossing to coat the asparagus, I splashed it with a couple of generous splashes of pomegranate infused red wine vinegar to give it a little different flavor and then tossed it to coat evenly. As soon as I pulled the salmon out of the oven (which was now at 425 degrees), I popped the pan of asparagus into the oven and turned the heat down to 400 degrees and roasted it for about 15 minutes while the salmon was resting under the foil cover.  I snapped a few photos for you to see below. Enjoy!


Here's a pic of the salmon before basting and roasting -- wild salmon's natural color is beautiful
Asparagus is ready to pop in the oven...

Sunday, June 23, 2013

Sunday's Greek Style Spinach-Feta Pie

This evening, youngest son came for dinner.  I had thought about making salmon for dinner -- but as I told you a week or 2 ago...he said he wasn't crazy about the wild Copper River salmon...so I will save that to fix for tomorrow's dinner.  Instead, I made my Greek Style Spinach-Feta Pie since I had a pound of fresh baby spinach that needed to be used.  I also like the fact that I will have a few pieces left to enjoy for lunch this week!  It reheats in the microwave beautifully.  The recipe is linked above and I snapped a couple photos for you to see below.  Enjoy!


Saturday, June 22, 2013

Grilled Scallops w/ Chipotle Garlic Lime Butter

This evening I grilled sea scallops for dinner.  I found some beautiful wild caught scallops last night at Costco.  I decided to keep them fairly simple so that the seasoning enhanced the delicate flavor of the scallops without covering it up or overpowering them. I patted the sea scallops completely dry and then threaded them onto bamboo skewers (that had been pre-soaked in water to keep them from burning up). I melted about 3 tablespoons of Kerrygold Garlic & Herb Butter and added the zest and juice of one small lime, about 1/4 teaspoon of Celtic sea salt and 2 generous dashes of ground chipotle chile pepper.  I brushed the scallops with the chipotle garlic lime butter and grilled them for about 4 minutes on each side.  I also grilled some red bell peppers to go with our scallops and served them with a side salad and some leftover ratatouille from Thursday night's dinner.

Also, while at Costco last night, I decided to pick up a jar of some of the most unusual looking olives I have ever seen...they are a bright, almost fluorescent green and I eye them up each time I go. While I am not a huge olive fan...hubby is.  He loves olive bars in specialty stores and markets, much the way I used to love the array at the "bar" at the Godiva store...LOL.  Anyway, I have never seen these olives anywhere else before and had read that they were more rare and might be found on olive bars that carry a wider array of olive types.  They are called Castelvetrano olives and they are brined instead of cured which makes them somewhat "crisp" and well as unusually bright colored. According to Mezzetta (the brand that I purchased), they are produced exclusively in Castelvetrano, Sicily.  Hubby really liked them and while I thought they were good...I am just not an olive person...but I am REALLY trying to be more so of one.  If you are interested in reading about these unusual olives, I have linked some information here:  Castelvetrano Olive Information.  I love learning little known facts like that.  I snapped a few photos of our dinner...it was simple, fresh and delicious. Enjoy!

Voila!


BOOM!

Saturday's Breakfast: Organic Eggs & Almond Flax Toast w/ "Banana Bread Greek Yogurt"

It's a beautiful bright and sunny morning here. Hubby and I slept in a little late and then got ready and took a long walk first thing, while it was still cool outside.  Since we did our Costco shopping after work last night, we have a bit more time to dilly-dally today (which is a good thing).  When we got back in from our walk...I made a nice "weekend breakfast" of fried organic eggs, toasted Almond Flax Bread that I keep sliced and frozen so I can pull it out and use when I am in the mood for toast. I also had coffee and "Banana Bread Greek Yogurt" that was awesome.  In a previous post, I mentioned some of the flavors of natural extracts I had purchased from OliveNation; one of the flavors was banana.  It is very intense so you don't need much to flavor yogurt -- only a few drops.  I mixed banana extract with some Ceylon cinnamon, stevia and chopped walnuts into my full fat Greek Gods Greek yogurt and I swear it tasted just like banana bread...it was awesome and I was sad to get to the bottom of my little bowl of it.  I snapped a couple photos for you to see below.  Enjoy!


Friday, June 21, 2013

Friday Night's Salad Bowl

This evening we made our Costco run after work instead of waiting until tomorrow morning.  Since we didn't get back home until almost 8:00 p.m., we picked up a rotisserie chicken so we could have a big main dish salad for dinner.  Before we left for Costco, I chopped a couple small heads of artisan romaine, sliced some red cabbage and mini San Marzano tomatoes and put them in the fridge so the salads would be quick to put together once we got back home.  When we got back, I cut up the roast chicken breast and placed it on top of big bowls of romaine, red cabbage, tomatoes, roasted sunflower seeds and shredded Parmigiano Reggiano.  It was quick and simple and wasn't a heavy meal so we can still get our walk in later this evening without feeling overstuffed. I snapped a few photos for you to see below.  Happy 1st Day of Summer!  Enjoy!

Voila!


BOOM!