Pages

Tuesday, July 31, 2012

Tuesday's "Pasta" w/ Quick Meat & Summer Veggie Sauce

Well, this evening I tried a new kind of pasta that I've been wanting to try for a while now.  I must say, it was absolutely delicious and so simple to make.  You could definitely say it was "fresh pasta"...but not what you are thinking of, I bet.  As you already know if you read this blog with any regularity...we really LOVE fresh vegetables (and fruit).  It is a large chunk of our grocery bill every week.  You might also know (if you read this blog) that at the moment, I am eliminating wheat, gluten and most grains from my diet to see if it helps some of my autoimmune issues I've been having.   So, with that in mind...can you guess what ingredient I used to make my "Zucchi-cini"???  No, I did not misspell zucchini...it is my new word for "zucchini fettucini".  Fettucini is thin ribbons of pasta...mine are thin ribbons of zucchini...hence "Zucchi-cini".  I made a quick, delicious thick and rich meat and summer veggie sauce to serve over my "pasta".  It wasn't just good...it was awesome...and I wouldn't lie to you!  Now of course, if you have a particular aversion to zucchini...then maybe this wouldn't be the pasta for you...but zucchini is so mild and almost tasteless by itself, much the way plain pasta is...that it really made a terrific backdrop for the sauce.  I snapped a couple pics below as well as my recipe for the Zucchi-cini and Quick Meat & Summer Veggie Sauce.  Enjoy!

Voila!
Zucchi-cini waiting to be sauteed.
Browned meat and veggies waiting to be "sauced".
Love this brand of sauces...this one has no added sugar.
BOOM!
In case you are wondering...YES, it tastes as good as it looks!!!

Zucchi-cini

Ingredients:
3-4 medium-large zucchinis (depending how many servings you want to make)
Olive oil
Salt, optional

Directions:
Cut off the top and bottom of the zucchinis.  Using a vegetable peeler (the kind you peel potatoes or carrots with) and holding the zucchini very carefully so you don't scrape your fingers, slice ribbons of zucchini lengthwise until you get to the seeded center , then rotate the zucchini repeating this all the way around until you have just the seedy center core remaining (you can either toss the center core or use it for something else like soup, etc.).  Set your zucchini ribbons aside in a bowl until you've made the amount of "pasta" you want to make.  In a non-stick medium to large skillet, drizzle about a tablespoon (or more if you like) of olive oil in the pan and heat on medium high just until the pan is heated well.  Toss in your zucchi-cini (sprinkle with a little salt if desired) and lightly sautee the "pasta" for a few minutes until it is the consistency you want it.  You don't want to cook it too long or your pasta will fall apart.  You want it to be "al dente".  Serve immediately, covered with your favorite sauce and Parmesan cheese.

Note:  Many zucchini noodle recipes call for boiling the noodles in water.  I have never ever cooked any zucchini with any water.  I think zucchini is much better when lightly cooked and if moistness is needed, cover it to steam in its own moisture a bit (they sweat out their own juices)...unless of course you really like the sound and feeling of "boiled zucchini" squeaking in your teeth when you eat it...personally I equate that sound/feeling to fingernails on a chalkboard.
~~~~~~~~~~~~~~~~~~~~~~~~~~~~~~~
Quick Meat & Summer Veggie Sauce

Ingredients:
1/2 pound of lean ground beef (I used ground sirloin)
3 medium yellow summer squash, sliced or diced
1 medium zucchini, sliced or diced
1 large carrot, peeled and diced finely
1 medium size jar of your favorite pasta sauce (I used DelGrosso's Sunday Marinara)
Few dashes of cayenne pepper, optional

Directions:
In a medium sized dutch oven or pot, brown your ground beef.  Add diced carrots to the browned beef and cover and cook on low about 5 minutes, stirring occasionally.  When the carrots have softened a bit, add yellow squash and zucchini, continuing to cook while stirring frequently.  Cover the meat and veggie mixture and cook on medium until the veggies are tender but not overcooked or mushy.  Pour jar of sauce over the meat and veggies; add cayenne and stir well.  Cover and simmer on low for about 20-25 minutes to let everything mingle a bit (and give you time to make/cook the pasta).  Serve sauce over the pasta of your choice; sprinkle with Parmesan and fresh basil, if desired.

Note:  You could easily add more or less meat or substitute turkey or chicken for the beef.  You could also omit the meat altogether if you don't eat meat.  You could add other veggies too such as mushrooms, onions, etc.  I like DelGrosso's Sunday Marinara because it is made with all natural ingredients and there is no sugar added.  This can easily be customized and personalized to suit your own personal tastes.  It's a pretty quick meal to put together, especially on busy work and school nights.

Monday, July 30, 2012

Monday's Grilled Marinated Wild Salmon...

Well, it was back to reality today (work).  It wasn't too bad though...this past week's vacation at the cabin gave me the rejuvenation I really needed.  This evening we had grilled marinated wild salmon for dinner with steamed fresh broccoli, salads w/ tomatoes from our garden (and hubby had a baked potato with his).  It was really good.  When I got home from work, I made a quick marinade for the salmon using the juice of a large lime, olive oil, Greek seasoning, sea salt, fresh cracked black pepper, a dash of cayenne and a little Tamari sauce.  I let it marinate for 45 minutes to 1 hour on the counter while I made salads, cut up and steamed the broccoli and baked hubby his potato.  I also made a quick vinaigrette for our salads using Pomegranate red wine vinegar, olive oil, sea salt, black pepper, cayenne, Greek seasoning and some Parmesan cheese (I probably never make it the same way twice since I don't measure anything).  For some reason, I am on a Pomegranate vinegar jag at the moment...and the funny thing is I picked it up by accident thinking I had picked up plain red wine vinegar and didn't realize until I got home that I got the "wrong one"...and it ended up turning out to be a favorite instead...go figure!  I snapped a couple pics of our dinner below.  Enjoy!


Sunday, July 29, 2012

Low Carb Pizza (Flax & Parmesan Pizza Crust)

Well, it is finally Sunday and our vacation is really over.  While it was nice being back home yesterday, it was fairly short lived.  Yesterday afternoon, we went out for a few hours to do our Costco run, grocery shopping and other errands.  In the short time we were gone...our air conditioning went down!!!  When we got back yesterday, I started fixing dinner after putting the groceries away.  I was excited to try a new recipe for a different wheat/gluten free pizza that I had found...and I noticed it felt "warm" in the house instead of the usual "cool".  I went to bump the thermostat down and saw that it was up to 79 (it was 76 when we left a few hours earlier).  I knew right away something wasn't right.  Hubby went up into the attic to check things and I went outside to see if the unit was running....nope, it wasn't!  So, I came back into the house and put all my dinner ingredients away because there was no way I was going to put the oven on 425 degrees without any a/c.  So, around 8:00 p.m., hubby and I ran out and picked up a rotisserie chicken and brought it back home.  I didn't even feel like making a salad at that point...so we had rotisserie chicken and water for dinner...LOL.  Fortunately, I was able to reach our repairman and he came out late Sunday afternoon to fix it for us.  We needed a new capacitor and in just 30 minutes he had us cooling again...thank God!  Enough of that...let me tell you about the new pizza recipe that I finally ended up making for dinner tonight.

I recently found a recipe that I wanted to try for pizza crust using flax seed meal as its base/main ingredient.  It didn't have a lot of ingredients and the pictures looked really good.  I found it on a blog called "Delighted Momma".  It actually looked like whole wheat pizza crust, and was very similar looking to a whole wheat Boboli, if you've ever seen or bought one of those.  I tweaked it just a tiny bit by adding about 1/3 cup of shredded Parmesan cheese to the dough.  I must say...it was really good and it actually looked like dough, felt like dough, and cooked into something that was more "genuine pizza crust looking, feeling and tasting".  It was like REAL pizza crust (much more so than the cauliflower crust I made recently).  Let me just put it this way...this recipe pushed the cauliflower pizza crust off of the map completely for me.  This recipe was much less time intensive to make...and the end product was a significantly more authentic and satisfying alternative to a regular wheat based pizza crust than the cauliflower crust I tried a couple of weeks ago.  Flax is very healthy for you too, and if you want to reduce the cholesterol a bit, you can substitute Egg Beaters in place of the 3 whole eggs this recipe uses.  I used organic golden flax seed meal because it has a much milder taste than some of the darker flax seed meals.  At this moment, I believe I have found my new "go to" wheat free pizza crust recipe.  I snapped a few pics below for you to see, as well as the recipe.  Enjoy!

Here is the crust after baking...looks similar to a Boboli crust
I put Rao's Pizza Sauce on it...it was good!
Fresh out of the oven, loaded with cooked onions, red, yellow and orange peppers and some diced leftover rotisserie chicken...not to mention mozzarella cheese!
Check out that crust...it looks awesome!
It even cuts like regular pizza crust...this is the real deal...just healthier!
BOOM!

Low Carb Pizza (Flax Crust)


Ingredients:

1-1/2 cups flax seed meal (I used organic golden flax which has a milder taste)
2 teaspoons baking powder (aluminum free)
1 teaspoon dried oregano (or Italian seasoning)
1 teaspoon Kosher salt, more or less to taste
1/2 teaspoon of Truvia (optional)
1/3 cup Parmesan cheese, finely grated
3 eggs (or 3/4 cup egg substitute such as Egg Beaters)
3 tablespoons olive oil
1/2 cup water

Directions:

Preheat oven to 425 degrees.  Mix dry ingredients together; add wet ingredients and mix well.


Let the dough sit for about 5 minutes to thicken. Spread dough on a lightly oiled large round pizza pan or on a cookie sheet with greased parchment paper (I used Reynolds non-stick foil, lightly brushed with olive oil).  Bake for 15-20 minutes or until cooked through (check it after 15 minutes and take out if it looks done).  Add sauce, cheese, pre-cooked toppings and place back into the oven for 5-10 minutes to melt the cheese.

*Note:  Pre-cook any veggie or raw meat toppings such as sausage, beef, etc. before topping the pizza, as you are simply heating and lightly browning the toppings when returning it to the oven for the last 10 minutes of cooking.  You may want to place it under the broiler for a few minutes for additional browning before removing. 

Saturday, July 28, 2012

Porch Music...We miss you already!!!

Well, we decided to check out late Friday night instead of getting up early in the morning to check out.  We got home a little after 10:30 p.m. and just finished emptying the car.  It is after midnight now and I am wide awake.  It was a wonderful, relaxing week at one of the most beautiful cabins we have ever seen, much less stayed in.  I have wanted to stay at this cabin for over 2-1/2 years now, and it has never been available when we were actually able to go...but somehow the stars were aligned this time and we were able to get it for an entire week.  We left around 8:30 p.m. and ended up picking the wrong route on our GPS to get home...by wrong, I mean this route used all BACK ROADS!!!  Ugh...back roads on unfamiliar little winding narrow roads (with only intermittent cell phone coverage) in the pitch dark, foggy, and occasionally rainy night was NOT a good thing...but we made it home safely and that's what counts!  On our drive from the cabin to the main road (2 miles of gravel road) we spotted a mother deer (doe) and her baby (fawn).  I snapped a few pics.  Enjoy!

Porch Music...we will be back!


Friday, July 27, 2012

We have all enjoyed our cabin vacation at "Porch Music"...especially the "little white guy"...

This has been such a relaxing week...I would be remiss if I didn't let you see how the "little guy" has enjoyed it too.  He has stopped to smell the flowers...stopped to look back and reflect a bit...looked down to watch the river rolling by...and finally stood on the front porch in all his "dorky glory", as if he owns this place.  Oh how he has enjoyed "Porch Music"...we all have.


Here he stands in all his "dorky glory"...acting as if he owns this place.

Friday's Fried Eggs for Breakfast..."Cabin Style"

Well, today is our last day to "sleep in late" at the cabin since we have to go home tomorrow morning.  Surprisingly, we slept in until 10:00 this morning...WOW!  Most of the mornings this past week I naturally woke up at 7:30 a.m...but I guess my body finally realized..."hey, you are on vacation..." and responded accordingly.  I feel rested, relaxed...and it feels wonderful.  I am trying to use up as much of our groceries as possible so I don't have to pack up so much to take back home tomorrow.  I fixed hubby a couple of eggs and turkey sausage and his beloved "asiago cheese bagel".  I fixed myself an egg on top of one of my "faux potato patties" (a leftover Cheddar Cauliflower Patty) that I made a few days ago.  We also had espresso coffee with our breakfast.  I snapped a couple pics below.  Enjoy!

"His"
"Hers"

Thursday, July 26, 2012

Thursday's Grilled Wild Salmon Dinner...

Well, this evening I finally cooked the salmon that I had originally planned for last night's dinner.  I marinated wild salmon filets in olive oil, the juice of a lemon, Greek seasoning, ground black pepper and a splash of Tamari sauce for about an hour.  While hubby grilled it, I made us big salads filled with cherry tomatoes from our garden back home that I brought with us and green beans with almonds.  Hubby also had a baked potato too.  It was a fresh, light dinner and we enjoyed it.  I snapped a few pics of our dinner below.  Enjoy!

Look what we saw out the window...
We figured the bears smelled the salmon grilling and decided to stop by!
BOOM!

Thursday Morning's Cabin-Style Omelets

This morning it is bright and sunny and 74 degrees here at 10:00.  The birds are singing, the bugs are making noise and you can hear the river running around the rocks in the river below.  We had omelets with white cheddar cheese and bacon bits for breakfast this morning and served them alongside Cheddar Cauliflower Patties topped with more white cheddar.  It was another lazy, peaceful morning.  We had big cups of hot espresso with our breakfast. 

Last night I had taken some wild salmon filets out to thaw and marinate so we could grill them for dinner...but instead we took late afternoon naps and woke up too late to do that...so we went in to town a few miles away and picked up a "Smoky Mountain Bourbon" rotisserie chicken at the store and came home and had that with big salads for our late night dinner.  I can't remember the last time I took a nap without being sick.  Also, yesterday I actually read a book...the ENTIRE book!!!  I have started this book so many times over the past year and just never gotten past the first chapter.  I guess this is what being able to relax and unwind a bit is all about.  I am beginning to like this...a lot.  I snapped a picture of our breakfast below.  Enjoy!


Wednesday, July 25, 2012

Wonderful Wednesday Morning Breakfast..."Cabin-Style"

Happy Wednesday!  It is a beautiful, bright and sunny day here this morning and 75 degrees.  I made us a nice breakfast, "cabin-style".  :-)  Hubby wanted a grilled cheese sandwich made on some cheddar jalapeno bread we picked up at the Farmer's Market & Orchard a couple days ago.  I cut it in thick slices and put a slice of sharp cheddar, provolone and swiss cheese in it before grilling it for him and served it with turkey sausage.  For myself, I heated up one of the Cheddar Cauliflower Patties leftover from last night's dinner and topped it with a fried egg (garnished with strips of cheddar cheese) and turkey sausage.  We both enjoyed a hot cup of Kahlua Hazelnut coffee with our breakfast.  It was absolutely delicious!  Check out a couple pics below.  Enjoy!

"His"
"Hers"


Tuesday, July 24, 2012

Lemon-Rosemary-Garlic Marinated Grilled Chicken with Cheddar Cauliflower Patties

This evening we grilled boneless chicken breasts that I marinated in a Lemon Rosemary Garlic Marinade that I made yesterday evening and let them marinate overnight.  I made Cheddar Cauliflower Patties to serve with our meal and baked sweet potatoes for daughter and hubby too (I had broccoli & carrots instead of sweet potato).

The marinade was good...very lemony.  I added 1/2 teaspoon of salt which might not be enough for some people, so adjust it according to your preference.  The Cheddar Cauliflower Patties were really good...but it is very important that you have the pan really hot before you add the cheese cauliflower mixture so they can quickly develop a "crust" to make it easier to flip them when it is time.  On the first batch I made, I added the mixture to the pan before the pan was hot enough and they were very difficult to flip without falling apart.  The second  batch came out much better.  Also, the head of cauliflower I used was quite large...so I probably needed to adjust and add more almond/coconut flour (or bread crumbs if you are using those instead) to dry the mixture up a little bit more.  They were very tasty though and once I realized I needed my pan to be hotter, it made the process much easier.  When I make them next time, I will probably add a little more almond/coconut flour as a thickener (or bread crumbs if you are using) to dry out the mixture more.  They tasted very similar to "potato cakes" you make with leftover mashed potatoes.  I snapped a few pics of dinner as well as the recipes for the marinade and Cheddar Cauliflower Patties below.  Enjoy!


Lemon-Rosemary-Garlic Marinated Grilled Chicken

INGREDIENTS:

1/3 cup fresh lemon juice (approximately 3 large lemons, squeezed)
2 teaspoons fresh lemon rind
1/3 cup olive oil
3 cloves garlic, minced
1 tablespoon fresh rosemary, chopped
1/2 teaspoon Kosher salt, or to taste
Freshly ground black pepper. to taste
Pinch cayenne pepper

3-4 boneless chicken breasts

DIRECTIONS:

Blend all ingredient wells and pour into a 1 gallon Ziploc bag.  Add chicken breasts; seal bag tightly, removing as much air as possible.  Marinate several hours or overnight.  Grill chicken until juices run clear; discard leftover marinade.
~~~~~~~~~~~~~~~~~~~~~~~~~~~~~~~~~~
Cheddar Cauliflower Patties

INGREDIENTS:

1 head cauliflower

2 large eggs
3/4 - 1 cup sharp cheddar cheese, grated
1/2 cup almond flour (see note below)
2 tablespoons coconut flour (see note below)
1/4 - 1/2 teaspoon cayenne pepper, optional
Salt and freshly ground black pepper, to taste
Olive oil (to coat skillet)

DIRECTIONS:


Cut cauliflower into florets and cook in boiling water until tender, about 10-15 minutes.  Drain well (if possible, it is better to cook all the water out of the pan near the end so cauliflower is as dried out as possible before mashing).  With cauliflower in the pan; over low heat, mash the cooked cauliflower in the pan to help evaporate any excess moisture.  Stir cheese, eggs, almond and coconut flour, cayenne pepper, salt and pepper to taste.

Coat the bottom of a griddle or non-stick skillet with olive oil over medium-high heat (the pan should be hot when you add the mixture to develop a light crust so you can flip them).  Form the cauliflower mixture into small patties about 3 inches across (if the mixture isn't thick enough to make patties, drop by heaping tablespoons into the heated and lightly oiled skillet and gently press down with back of spoon to form patties). Cook until golden brown and set on both sides, about 3-4 minutes per side until golden brown. 
Makes about 10-12 patties.

Note:  You can substitute 1/2 cup of Panko bread crumbs instead of using the almond and coconut flour if you aren't concerned about "gluten or wheat free".

Best Cabin Vacation...Ever!!!

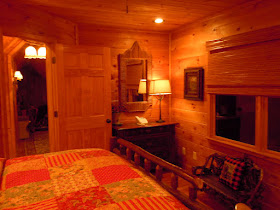
The cabin we are vacationing at is, hands down, truly the most beautiful...ever.  I think it has forever ruined any other cabin we could potentially ever stay at because we would always be comparing it to this one.  In order to share some pics with friends and family, I have snapped some highlights of this beautiful and unique cabin so you can see for yourself what I'm talking about!  I have already posted beautiful pics of the screened porch (my favorite room)...but the inside is even more beautiful, if you can imagine.  If you are interested...check them out below (I took these at night, which is why all the lights are on).  Enjoy!

Dining Room, Kitchen & Keeping Room (w/ fireplace)


Great Room / Family Room Below (w/ fireplace)


                                             Master Bedroom on 1st Floor


 Bedroom #2 (Upstairs)


Loft area at top of stairs leading to bedrooms #2 & #3


Bedroom #3 (Upstairs)


One last set of "Screened Porch" Shots -- My Favorite Room!


3rd Fireplace (on the screened porch)