Sunday, January 19, 2020

Sad News...

Greetings friends...

Unfortunately I will be taking a brief absence. I lost my best friend Spike on Wednesday. He had turned 16 on Monday. He was my best friend, my baby, my shadow and my heart. I was his person and he mine.

We are devastated and lost without him. The silence is deafening. I pray that there really is a Rainbow Bridge so we can be together again one day. Run free my sweet boy. 

I've put together a few of my favorite photos in a video collage below (a link to my Facebook post). I believe that even if you don't have Facebook you will be able to see the video if you choose. 


Monday, January 13, 2020

Easy Beef & Brussels Stir-Fry - Low Carb

Happy Monday! It was a nasty, dark and dreary day here today and it rained on and off most of the day. I spent all day yesterday taking down our Christmas decorations (yeah, I know it's kind of late) so I didn't get my grocery shopping done. I stopped at Sprouts Farmers Market on my way home from work this evening and decided to let what looked good determine what I would make for dinner. I really had no plan whatsoever. Well, as luck would have it, their fresh brussels sprouts looked amazing; like REALLY amazing. So that was the basis of dinner.

I strolled over to the meat section and their ground sirloin looked awesome (as in amazeballs awesome). I picked up a beautiful sweet onion and decided I was going to make dinner with these 3 items. I frequently make a similar dish using sliced smoked chicken sausage links (Aidells) and brussels sprouts as a quick worknight meal and wondered how something similar would be using ground sirloin. I already had red bell peppers in the fridge and decided I'd add a bit of those too for a pop of sweetness, crunch and color (they are the sweet griller variety that I find at Publix and my favorite). So, with these few basic ingredients I made one of my new favorite quick meals. Hubby absolutely loved it too.

I lightly sautéed diced onion in olive oil and then added the ground beef and chopped it up and browned it over medium-high heat so it caramelized slightly for flavor. I seasoned it liberally (as in a little more than usual) with pink Himalayan sea salt and lots of freshly ground black pepper to give it some pizzazz. I trimmed and sliced up my brussels sprouts while the meat browned, stopping frequently to stir the browning meat. I added my sliced sprouts to the pan along with a bit more olive oil and stir-fried it for a couple more minutes, then added a little water, reduced the heat a bit and covered it for 5 minutes to steam and soften the sprouts a bit but not so much that they became drab green and mushy. They still had a bit of chew and bite. I added the diced red bell pepper and a bit more oil and cooked it uncovered for a couple minutes until the peppers were slightly cooked. I tasted the seasoning and added a bit more salt and pepper and served it in shallow bowls. It was so very good. I have enough leftover for my lunch tomorrow too. It was so easy and so basic. Nothing fancy but so very good. The most time consuming part was slicing up the sprouts. To save time you could buy some already sliced if you want. The easy recipe and photos are below. Enjoy!


Easy Beef and Brussels Stir-Fry

Ingredients:

3 to 4 tablespoons extra virgin olive oil
1/2 medium sweet onion, diced
1 pound ground beef (I used sirloin)
1-1/2 pounds small to medium fresh brussels sprouts, trimmed and sliced 1/4-inch thick
1/4 cup water
1/2 red bell pepper, diced (I used red sweet griller peppers)
Salt and black pepper, to taste

Directions:

In a large wok or skillet (using a pan that has a lid that fits), add 2 tablespoons olive oil and heat over medium-high heat. Add diced onion and cook 1 to 2 minutes until they begin to soften slightly. Break up ground beef and drop into pan in clumps, chopping and breaking up with a large spatula or spoon as it browns along with the onions. Season with salt and pepper, to taste (I used it generously to add flavor). Add remaining 2 tablespoons olive oil and sliced brussels sprouts to the pan. Turn heat up slightly and stir frequently for 1 to 2 minutes. Add the water and cover the pan; turn heat down to medium and allow to steam covered for 5 minutes. Remove lid and stir in diced red bell peppers. Cook, stirring frequently for another minute or two until peppers are crisp-tender. Add additional olive oil if desired and season to taste.


Saturday, January 11, 2020

Eat the Rainbow - Happy 2020!

Happy New Year!  My first New Year's resolution is to get back to the things that I love. So, I am beginning with that here. 

Long time, no see...right? I'm not going to lie, it has been a tough couple of years for me for so many reasons which I won't get into. Not now at least. I never intended to stop blogging. But when things in my life got really stressful and hard, I stopped doing the things that I didn't absolutely have to do. One day became 2 days, which turned into 2 weeks, which then turned into 2 months and before you know it over a year had gone by. During this stressful/difficult time I fell off the low carb wagon and essentially stopped taking care of me. 

So, here I am today beginning with baby steps. I have always been a very private person...to a fault and my own detriment at times. I am an open book to those I'm closest to. My blog, besides being a platform to share my love of cooking and eating, this blog gave me a little spot in the world to share myself with so many people that I got to "know" over the years (I began blogging in 2012). I'm making my first baby step back today. Nothing fancy and I didn't plan or set out to do this today, but as I made my breakfast/brunch this morning and snapped a photo to share with my daughter, I thought...why not share it with others too. So, I posted it first to Instagram, then Facebook and Twitter. And while many of you probably use at least one of those social media platforms, I know there are some of you that don't. So I came back here to my blog...my home base...to share my simple breakfast with you. 

I'm not sure who, if anyone, will even see this post since I've been absent for so long, but even if there is only one of you that sees it...that's okay too. So here I am again...and I'd like to share my breakfast/brunch with you. Nothing fancy...a simple veggie omelet filled with sauteed onions red peppers and mushrooms with a bit of spicy cheese inside and a side of fresh strawberries and blueberries. They say you should eat the rainbow...so I did. Here's my rainbow breakfast. Happy 2020. Enjoy!

P.S. -- I've missed you!


Sunday, August 19, 2018

Grilled Steak, Yellow Cheddar Squash Casserole & Easy Coleslaw

This evening I decided to take a chance and grill steak in between forecasted rainstorms and I lucked out! I planned to grill them last night but the weather didn't cooperate. I also made a half-recipe of my Yellow Cheddar Squash Casserole. I cooked it in a quiche dish that is about 1-inch deep. It turned out great and only took about 25 minutes to cook since it was so shallow. I sautéed some red peppers and Vidalia onions to go with my steak and also made my Easy Coleslaw. It was an easy meal to put together and a perfect Sunday summer meal. I snapped a few photos below. The recipes for my squash casserole and coleslaw can be found by clicking the bolded name of the dish in this paragraph above.


Tuesday, August 14, 2018

Greek Style Chicken w/ Roasted Tomatoes & Feta Cheese Over Cauli-Mash

This evening we enjoyed a delicious "Greek style" meal. I made Greek Style Chicken w/ Roasted Tomatoes and Feta Cheese and served the chicken over top of Mashed Creamy Cauliflower. It was full of fresh flavors; roasted multi-colored baby tomatoes (tossed w/ olive oil, salt and pepper), chicken breasts pounded and marinated in fresh lemon juice and olive oil (seasoned with Penzey's Greek Style Seasoning) and then grilled. I served the chicken over a bed of mashed fresh cauliflower and scattered the roasted tomatoes and some crumbled feta cheese on top. We had a small piece of Spinach Feta Pie that I made last night for dinner. 

Last night I made a large (9 x 13") rectangular version of my Greek Style Spinach Feta Pie. It turned out amazing. It had crust on the bottom and about 1/2 inch up the sides of the pan. I made 1-1/2 times the crust (using 3 cups of almond flour and an additional 1 tablespoon butter), 1 pound of baby spinach and 1-1/2 to 2 cups of crumbled feta, doubled the fresh dill and lemon zest, and used 15 eggs (which triples the eggs used in the standard sized version to make a nice thick piece of spinach feta pie). It turned out amazing. I wanted to make a large one that we could enjoy for lunch and other meals throughout the week (bake once; eat several times). I had it for lunch today and also served a small piece alongside tonight's Greek Style Chicken w/ Roasted Tomatoes & Feta Cheese. This was an absolutely amazing meal. Check it out the photos below. Enjoy!


Tuesday, August 7, 2018

Roasted Tomato, Pesto & Pepperoni Pizza - Low Carb Cheese Head Crust

This evening I made my pizza with my Cheese Head Pizza Crust. I had a large container of multicolored grape and cherry tomatoes that I picked up at Costco this past weekend (by Mucci Farms). I also had that large jar of Costco's Kirkland brand fresh basil pesto that I opened last night to brush on my wild salmon before roasting. So, those two ingredients were what I based my pizza off of this evening and it turned out AMAZING! I sliced and halved about one to two cups of cherry/grape tomatoes and tossed them in olive oil and placed them on a parchment lined baking pan, cut side up. I roasted them for about 30 to 35 minutes at 375 degrees and then turned up the temperature to 425 degrees to bake my pizza crust. I removed the tomatoes as soon as my oven hit 425 degrees and then set them aside to cool off.

I made my pizza crust without seasoning (omitting the salt, garlic powder and Italian seasoning) since I was going to use pesto on my pizza which is infused with loads of herbaceous flavor. I spread the dough out on a large parchment lined baking sheet and baked it for about 12 minutes until lightly golden. I removed the crust from the oven and then brushed and spread it with a few heaping tablespoons of the pesto; scattered it with shredded mozzarella cheese, topped it with Boars Head sandwich pepperoni (that I quartered) and then scattered with the roasted tomatoes. I reduced the oven temperature to 375 and popped the pizza back in the oven and baked for about 8 to 10 minutes, then turned my broiler on low and ran it under it for about 2 to 3 minutes until the cheese began to bubble, but not burn. I removed it from the oven and let it sit for about 5 to 7 minutes to cool and allow the crust to crisp up, which it does VERY nicely, making it easy to pick up and eat by the slice (no forks required). The pesto mellows out so nicely when baked on the crust and is so delicious. Like I've said before I'm not a big pesto fan but if you can find a way to cook it for a bit on whatever you are using it in, it has such a delicate and flavorful herb flavor in a not-in-your-face kind of way. I snapped some photos below. You can find the recipe for my crust here: Cheese Head Pizza Crust. Enjoy!


Monday, August 6, 2018

Pesto Roasted Wild Sockeye Salmon w/ Cauli-Mash & Roasted Brussels Sprouts

This evening I made one of my favorite meals because each of the 3 items I prepared are my faves (Pesto Roasted Salmon, Cauliflower Mash, and Roasted Brussels Sprouts). I picked up a couple of large wild sockeye salmon fillets at Costco this weekend ($9.99/lb). Each was a little over 1-1/2 lbs. I cut one fillet up into portions, wrapped them and froze. The other one I prepared and roasted as a large fillet that I coated first with pesto. I usually use Mezzetta's pesto that comes in a small jar, but Costco had a large jar of their fresh pesto on sale so I decided to pick up a jar to try. It was really good and I would definitely purchase it again. Now, to be honest, I have never really been a big pesto fan. I find the taste to be too intense most of the time, but when you baste the salmon with it before roasting, the pesto cooks and goes from brilliant green to a more muted color and a delicate milder flavor. I do think that the pesto in its fresh state would overpower the mild salmon flavor but it mellows out perfectly when roasted atop the salmon. I typically roast smaller individual portions of salmon for 12 minutes but since I roasted the large fillet intact, I added 3 minutes for a total of 15 minutes which was perfect. You simply brush the salmon fillet with pesto (as much or as little as you like), place it on a foil covered sheet pan and into a preheated 450 degree oven that you immediately reduce to 425 degrees after placing the salmon inside. I roasted it at 425 degrees for 15 minutes, removed it from the oven and then immediately covered it with heavy duty foil and allowed it to sit for 5 to 10 minutes. It turned out tender, moist and so delicately flavored by the pesto that roasted along with the fillet.

I roasted quartered brussels sprouts tossed with olive oil, salt and pepper on another sheet pan at the same time and they were done at about the same time. I had a large head of fresh cauliflower that I cut up into florets and cooked in 1 cup of water with about 1/2 to 3/4 teaspoon salt. I cooked it until tender and then uncovered the pan and turned up the heat and cooked until all the water evaporated. I then added a couple tablespoons half-and-half, 2 tablespoons of butter and 2 to 3 ounces of brick style cream cheese and then pureed it with my immersion stick blender in the pan. I absolutely love my stick blender for things like this. I seasoned the mashed cauliflower with salt and pepper to taste. Hubby couldn't stop oohing and awing over how delicious tonight's meal was. It was so good to cook again. Our a/c has been giving us problems over the last 2 weeks (4 service calls and 9 days without a/c in a 2 week period). That is part of the reason I haven't posted much because I haven't wanted to turn the oven on and we've had so much rain that we didn't get to grill other than maybe once I believe! I snapped a few photos our tonight's meal and included the link to the Pesto Roasted Salmon. Enjoy!


Sunday, July 15, 2018

Grilled Wild Alaskan Salmon w/ Orange Tamari Butter

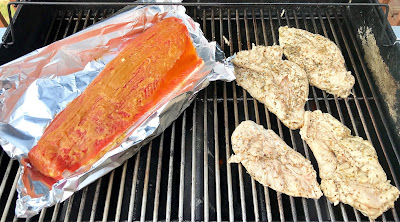
This weekend we found fresh Wild Alaskan Salmon on our Costco trip. I was so excited to see it again. I picked up a single large 2-pound fillet. This time it was priced at $9.99/lb which is a GREAT price, considering several weeks ago I paid $16.99/lb at Costco. I decided to cook it on the grill since it was so hot here today. It helped to keep the house cool without having to turn the oven on (although you can also roast this salmon in the oven). I whisked together a quick and easy Orange Tamari Butter to brush the salmon with. It was so delicious and mild and did not detract from the delicate flavor of the salmon. I served it with steamed fresh broccoli.

Since we've got quite a bit of rain in our forecast this week, I pounded some boneless chicken breasts and whisked together a quick herby marinade and marinated the chicken all afternoon and went ahead and grilled that alongside tonight's salmon to get a head start on a few meals for the week. I like to cut grilled marinated chicken into chunks and add it on top of a big fresh green salad for a quick and cool weeknight meal. I snapped several photos of tonight's beautiful, fresh and easy meal below. Enjoy!


Grill-Roasted Wild Alaskan Salmon with Orange Tamari Butter

Ingredients:

2 pounds wild salmon fillets (rinsed and patted dry)
3 to 4 tablespoons butter
3 to 4 tablespoons orange juice
1/2 teaspoon orange zest
1 to 2 tablespoons organic Tamari sauce

Directions:

Preheat grill (or oven) to 425-450 degrees. In a small saucepan, melt butter over low heat. Remove from heat and whisk in orange juice, orange zest, and Tamari sauce. Allow to set for a few minutes until the butter cools a bit and begins to thicken slightly so when you brush it on your salmon fillet, it doesn't roll off.

Place salmon fillets in center of large sheet of foil. Gently crimp and form foil into a packet around salmon fillet to hold butter and juices as it grills (keep packet open on top while roasting). Brush salmon fillets with orange Tamari butter. Carefully place foil packet of salmon on hot grill and close lid. Try and maintain grill temperature between 425 and 450 degrees F. Cook for 10 to 12 minutes, depending on thickness of fillets. Carefully remove and transfer foil packet to a platter or baking sheet. Crimp and close packet tightly to allow salmon to continue cooking gently off the heat for about 5 to 10 minutes. Spoon and drizzle salmon with orange butter juices when serving.


Wednesday, July 11, 2018

Southern Turkey Burgers w/ Vidalia Onions & Pimento Cheese

This evening I was in the mood to grill a few of the frozen turkey burgers that I had in the freezer (I buy these frozen from Costco). You grill them frozen for about 6 to 7 minutes per side (I spritz them with olive oil before grilling). Since these are made with turkey breast, you need to be careful not to overcook them because they will be dry. These turned out great. Of course you don't need to use turkey you could use ground beef or chicken as well. I also grilled a thick slice of Vidalia onion to go with my burger. We topped our burgers with a small scoop of Pimento Cheese w/ Jalapenos which added a lot of flavor using only a small amount. I had a few of my grain free sesame seed buns left from this past weekend so I put my burger on a bun. I started by placing the grilled Vidalia onion on the bottom of my bun, then topped it with the burger and then the pimento cheese and a few Bubbie's pickles. If this doesn't qualify as a "Southern Turkey Burger" with both Vidalia Onion and pimento cheese, I don't know what does!

We enjoyed our burgers with a side of Bubbie's sauerkraut. It was a delicious, quick and easy meal. I grilled an extra burger to have for tomorrow's lunch. I want to share my excitement with you this evening because I feel like I won the Bubbie's lottery. Wait until you hear the deal I got! Unfortunately, a couple of our local "The Fresh Market" stores are closing and everything in the stores were on sale for an additional 30% off. I headed there straight from work and was so excited that they still had Bubbie's on the shelf. I picked up 2 big jars of their pickles and 2 big jars of their sauerkraut for only $3.48 each (normally $9 to $10/jar depending on where you buy them). I couldn't wait to incorporate them into our dinner tonight. The only regret I have is that I didn't buy all they had left. I snapped a few photos of the easy "Southern Turkey Burgers" below. Enjoy!


Tuesday, July 10, 2018

Best Grain-Free Bagels - Low Carb, Gluten Free & Delicious


Tonight I am finally sharing my bagel recipe. I began working on it last summer...1 year ago (June 2017). I have been tweaking it and have made at least half a dozen different recipes, tweaking each one. I didn't just want it to taste good, because honestly, all the versions I made actually tasted good.

I kept tweaking it, not only for texture but just as important for me was to make a recipe that wouldn't be so frustrating to make for the average person that wasn't a "baker" or who maybe wasn't used to handling regular dough. In the first 4 versions I made, I rolled the dough into ropes with my hands and formed each bagel. I found it to be messy because this dough doesn't have the same elasticity that dough made with wheat and yeast has. I feared it would make some of you break out all of your bad words (not that I know anything about that) both at me and at the dough. And you certainly wouldn't be excited to make them again. With each of my 6+ versions, I not only tweaked the ingredients but used different pans to see how they baked. Also, when you look at the recipe...just so you know, the teaspoon of apple cider vinegar that is added can not be tasted at all. It is there to react with the baking soda to help lighten the dough. You can make plain bagels, or top with grated Parmesan or Asiago cheese for cheesy bagels or my favorite, add sesame seeds. You could make "everything bagels" or even poppy seed.

One more thing. I have made this recipe 3 times, to use different pans/methods to bake. I made them on a parchment lined baking sheet and they are good but they spread more and are thinner (but just as delicious). I made them in my deeper USA Pan 6-well mini-cake pan and they are good but it contains them so much that they are thicker, and closer to hamburger buns. My favorite result was using my Chicago Metallic Professional 6-well muffin top pan. The reason I preferred this pan was it has the shallow wells that help contain the spread, but since it doesn't have deeper wells, it allows them to spread a bit and brown and it produced a not too thick/not too thin bagel that could be sliced in half more easily. These bagels are not the 1-1/2" to 2" thick bagels of your wheat eating days. But you will find them very satisfying and delicious. I hope you give them a try and let me know what you think. Check out the recipe and photos below. Enjoy!


Grain-Free Bagels

INGREDIENTS:

10 ounces (2-1/2 cups) shredded mozzarella
3 ounces brick style cream cheese
1 cup almond flour
1/4 cup PLUS 2 Tablespoons (6 Tablespoons) ground golden flax seeds
1/4 teaspoon salt
1 teaspoon baking powder
1 teaspoon baking soda
2 large eggs
1 teaspoon apple cider vinegar
2 Tablespoons sesame seeds or 2 Tablespoons shredded Parmesan or Asiago cheese, optional

DIRECTIONS:

Preheat oven to 400 degrees F. Lightly spray a 6-cup nonstick muffin top pan with olive oil. Alternatively you can line a large baking sheet with parchment paper (bagels will spread out more and be thinner). 

Place mozzarella and cream cheese in a medium bowl. Heat cheese in microwave on high for 45 seconds; stir and heat an additional 45 seconds or until a hot melted mass of cheese is formed; blend well, folding with a rubber spatula. 

While cheese is melting in microwave, in a separate medium bowl, combine almond flour, ground flax, salt, baking powder and baking soda; whisk until blended. In a separate small bowl, beat egg and vinegar together; set aside. Add flour mixture to bowl of hot melted cheese (make sure cheese is hot before adding flour mixture; return to microwave for 10 to 15 seconds or till hot). Working quickly, fold dry mixture into melted cheese using a rubber spatula until dough begins to come together and cheese and dry ingredients are combined; add egg/vinegar mixture and continue folding into dough until combined. The texture of the dough will begin to become light and airy. Continue folding mixture until thoroughly combined. 

Divide into 6 even pieces (I cut it into wedges in the bowl with a knife). Very lightly oil or wet hands to prevent dough from sticking. Scoop each section of dough with a spoon; using your hands, form dough into a large meatball shape, then pat to flatten into a burger shape approximately 1-inch thick in the palm of your hand (if desired lightly press dough patty into a shallow bowl lined with sesame seeds). Using your index finger of your other hand, poke a hole in the center of the dough patty, wiggling finger in a circular motion until a smooth hole forms in the center. Place in muffin top well and repeat until all six are formed. (If using a parchment lined baking sheet, space bagels about 2 inches apart; sprinkle with sesame seeds or grated cheese, if desired). 

Bake for 12 minutes. Remove from oven to reopen bagel holes by using the tip  of a handle from a wooden spoon, dipped in olive oil, using a circular motion to reopen the holes. Reduce oven temp to 375 degrees and return bagels to oven and bake for an additional 5 to 6 minutes or until golden brown. Allow to cool in pan 5 minutes; carefully remove to a wire cooling rack to cool. Use a sharp serrated knife to slice in half; spread with butter or cream cheese as desired.

*Note: If blended dough is too soft to handle, allow to cool for a minute or two to firm up a bit before shaping into bagels. If bagels begin to brown unevenly, rotate pan half way through for more even browning.